I don’t know about you, but I LOVE a good before and after post, and this time, I’m excited to be the one writing it! Back in January of 2021, we started working on giving our home office/second guest room/video game room/junk room a MUCH needed makeover, and three months later, I can finally say we are done!
In this blog post, I am going to walk you through the entire process of updating this space, from exactly why it wasn’t working for us, to my thought process behind some of the design choices and layout, all the way to how we solved each problem while working on a budget! At the end, I’ll link as many sources as I can for you so that you can shop this look!
Disclaimer: Some links contained in this post are affiliate links. That means that if you click on the link and purchase an item, I get a small percentage of that sale at no extra cost to you. As an Amazon Associate I earn from qualifying purchases. Please know that products and brands recommended here at stay home style are products that I use, love, and trust.
Let’s start with how this space looked and functioned before, and I’ll tell a little bit about why it needed a change (besides the obvious… It was ugly 😂).
BEFORE


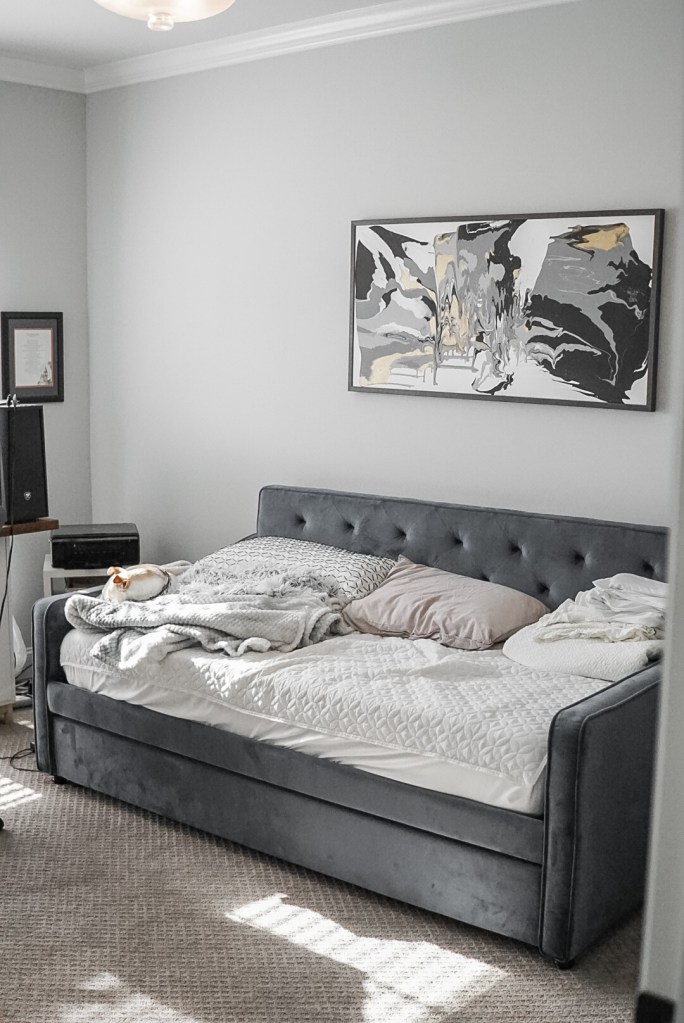


Okay, so if you just saw that very first picture, you might say, oh that’s not so bad… but, if you keep going, you’ll see what it looked like on a regular day to day basis. This space functioned as an office for John, a second guest room that could sleep two people, and a video game room where John could have all of his gaming systems in one place. The closet served as a place to throw junk that didn’t have a place to go, and overall, the room was just always messy and unorganized. Not to mention, it wasn’t really pretty at all, and I’m a lover of pretty spaces.
Here are a few more specific reasons this space wasn’t working for us:
- The daybed was impossible to keep made, because we used it as a sofa unless we had guests. I tried daybed comforters, daybed covers, just plain sheets, but no matter what it always looked messy.
- The day bed was too big for the room and made accessing the printer in the corner a hassle (we use the printer a lot). Not to mention, the size of the daybed made the room feel even smaller than it already was.
- The royal blue velvet did not mix well with the colors in the room, and honestly, it was a really hard color to design around.
- The artwork above the daybed was something we painted for our first apartment, but it did NOT go well in our new home.
- John’s monitors and computer tower blocked a lot of natural light and honestly, just looked kind of ugly in front of the window.
- John’s desk was the first thing you saw when you walked in the room and it was ALWAYS a mess. There were always cords and papers everywhere.
- I really wanted to get a desktop computer for myself, since I was still working from home most of the time and was spending more time working on the blog. I didn’t want our true guest room to feel like an office guest room combo, so I really needed to find space for a second desk in this room. Unfortunately, as it was before, there just wasn’t enough space to add a second desk.
- Our TV stand was a little lower to the ground than I wanted, and it didn’t have enough storage.
- The curtains we had looked cheap and the bulky finials on the rod didn’t work well for the tight space between the wall and left side of the window.
- The carpet looked blah, and I really wanted a rug for this space (the dream would’ve been to rip it up and put down hardwood, but a rug was a much more budget friendly option 🙈)
- Nothing matched and nothing felt aesthetically pleasing, which is important to me!
If that list doesn’t convince you… hopefully the after shots will 😆
WANTS, NEEDS, AND THE THOUGHT PROCESS BEHIND THE DESIGN


So, before we get into how we fixed this space to make it look better, feel bigger, and better serve our needs, let me talk about what we wanted for the space and our thought process behind the design.
Functionality Needs and Aesthetic Wants
- Need: space for two desks
- Need: a second desk
- Need: space to sleep two people
- Want: sleeper sofa instead of a daybed
- Need: space for John’s computer tower and cords so that they are out of sight and out of mind
- Want: rug to breakup the sea of tan carpet
- Want: a more neutral color palette (bye royal blue) and to have colors, patterns, and textures that work together to create a cohesive look
- Need: a designated space for the printer with easy access
- Need: a taller TV cabinet with more storage
- Want: new curtains and rod
- Want: new artwork over sofa/bed
- Want and Need (for the sake of my sanity and happiness): a space that was aesthetically pleasing and could easily be kept tidy and organized
- Need: affordable updates and furniture that won’t break the bank
Thought Process behind the Design
So thinking about how to layout this room and make it adhere to all the wants and needs mentioned above seriously kept me up at night for a few weeks😂
There were a few things that made this space tricky:
- It is a small room to be serving all the purposes it does. If it was just a guest room or just an office or just a TV/video game room, or even if we just didn’t need two desks in here, it would have made the design process much easier… but we live in an 1850 square foot house with only 3 bedrooms, so we had to work with the space we had to meet our needs! We fairly often have enough guests to need both this room and our true guest room, and sometimes even our couch, so the sleeping space was not something we wanted to give up here!
- The protruding wall that creates the little window nook. This wall could have worked to our benefit had it stuck out a little further, but on both sides it was shorter than any daybed or sleeper sofa we could find, so the placement of the sleeper sofa had to be where the daybed originally was.
- Since the sleeper sofa had to stay in the same place, the TV also had to stay in the same place, which meant that the only space for a second desk was on the wall with the junk closet.
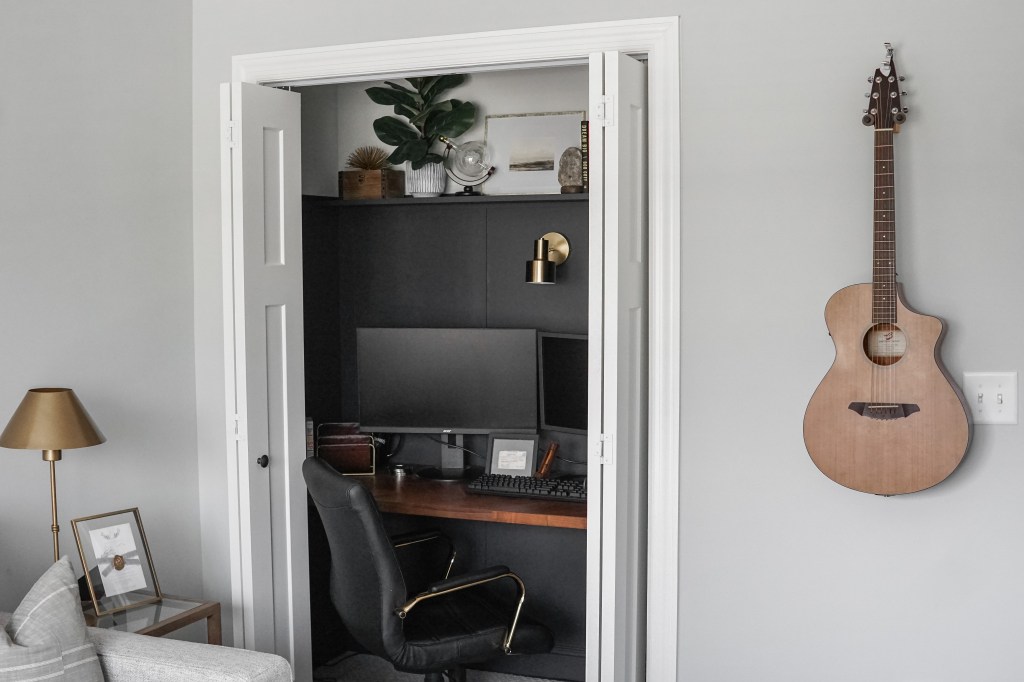

Originally, I had this idea to create built in shelving on the wall with the TV that could function as a TV stand and desk, but built in’s (even if you do them yourself) can be costly and time consuming, and I didn’t think these were really the best use of our time and money.
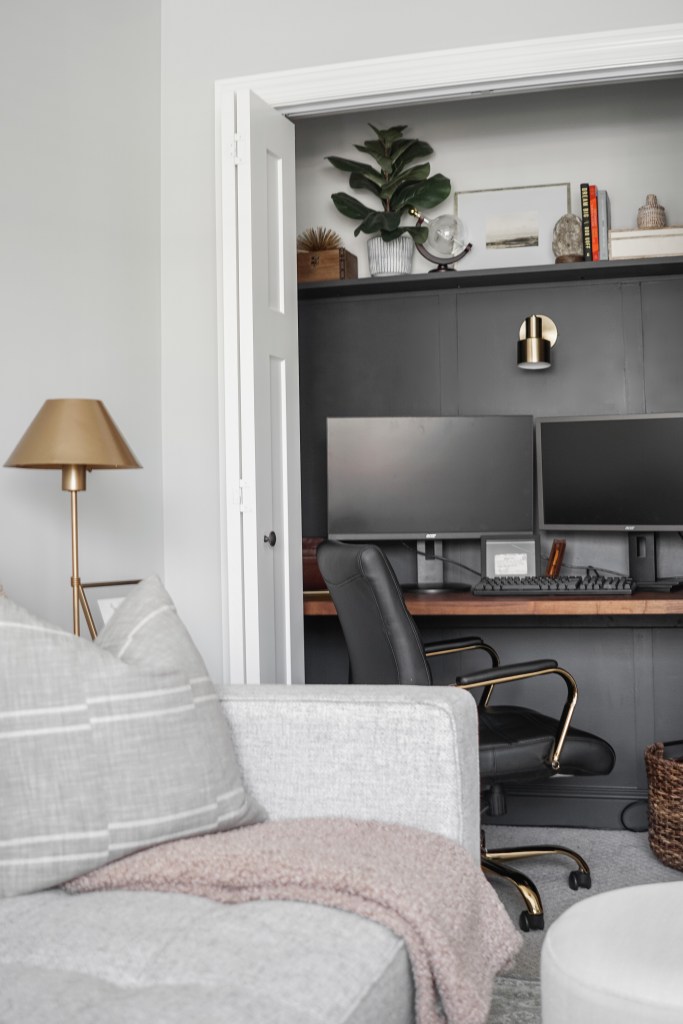
So this led to the idea of the cloffice! Since the wall with the closet was really the only option for a second desk, I thought, why not get rid of the junk closet and turn it into a functional desk nook? Could be fun, right? RIGHT! Literally the perfect solution to so many problems. I’ll get to why a bit later, but for now, I want to keep going with the thought process behind the design for this space.

So once I figured out how we were going to make room for a second desk, I kind of had an idea of how the room would be laid out. A desk in front of the window, a desk in the closet, a sleeper sofa where the daybed was, and the TV would be staying where it was. Cool, now I have to find a bunch of new furniture that works in this space, meets our needs, and won’t break the bank… where do I start?
Well, I started by shopping for the two big ticket items: the sleeper sofa and the desk that would go in front of the window.
I knew I wanted a more neutral color palette in this space, so I wanted to find a sleeper sofa that was neutral, modern, and queen sized so it could sleep two people. Oh, and I really wanted it to cost less than $500… which is totally unrealistic and pretty much impossible to find (unless you’re searching on Facebook Marketplace, and believe me, I looked and looked, but didn’t find what I was looking for nearby). So I had to up the budget just a little for that, but I found the perfect piece at a great price and I’ll tell you all about it a little later in this post.
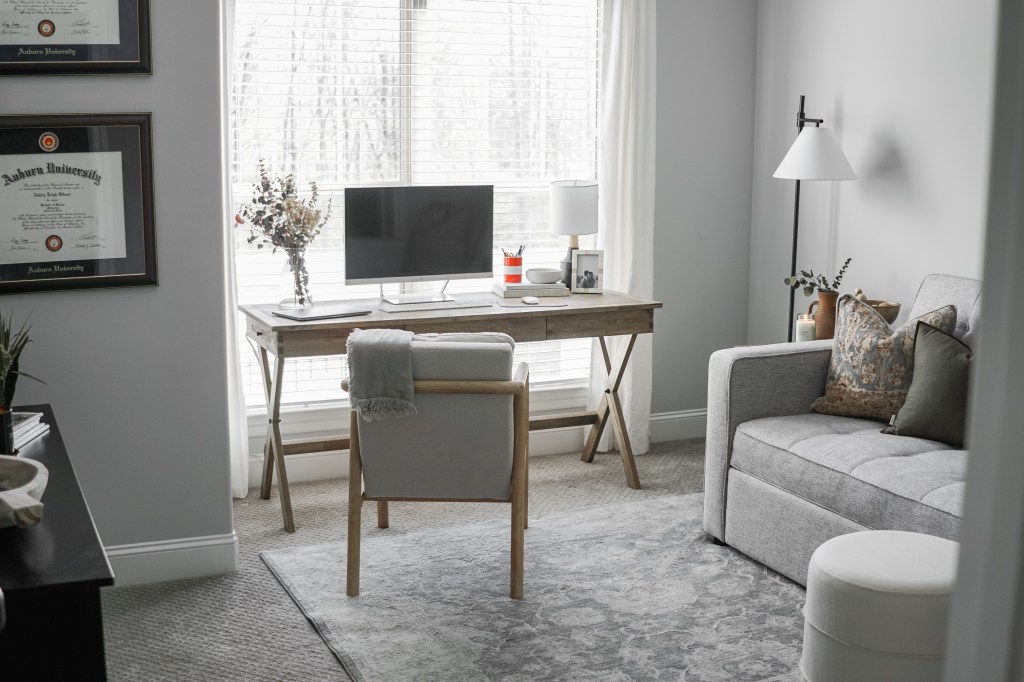
For the desk, I knew I wanted something that was real wood, had a timeless design, had at least one drawer for storage, and was light (in terms of how it looks) and open so that it would block the least amount of light possible since it was in front of the window.

Once I found those two items, the rest of the furniture and decor trickled in little by little. I was able to shop around and find some really good deals at places like Dirt Cheap, TJ Maxx, and Facebook Marketplace to keep things budget friendly! Since I wasn’t in a hurry to get this room done, I was able to take my time and find pieces that I really loved and worked well in this space, and I was also able to sell our old furniture and make back some of the money we spent on all of the updates.
Hopefully this gives you a little bit of insight as to why we laid out this space the way we did, and how I went about figuring out how to make this space work to meet our needs. Now, I want to move on to the specifics of how we fixed things!
SO HOW EXACTLY DID WE FIX IT?
Now that I’ve laid out for you what was wrong with this space, what needed to change for it to meet our wants and needs, and the thought process behind some of the design and space planning choices we made, I want to go through each bullet I listed under “Functionality Needs and Aesthetic Wants” and tell you exactly how we solved each problem on a budget!
NEED: SPACE FOR TWO DESKS

Solution: The cloffice!
I told y’all the cloffice solved quite a few of these bullet point problems, and this was the big one! By converting the “junk closet” into a desk space, we were able to move John’s computer into the cloffice and make room for a second desk for me! Now, he has his own dark and moody man cave and I have a big, pretty desk in front of the window. A win win if you ask me.
Before, John’s desk was a piece of butcher block on top of two IKEA shelves. We cut and repurposed the butcher block to serve as a floating desk in the closet, and sold the IKEA shelves on Facebook Marketplace. The total cost for the cloffice renovation was $75 (since we already had the butcher block), and we sold the IKEA shelves for $75, which made the cloffice come out to be $0 in terms of money, and it only took a weekend to complete in terms of time!
To read all the details on how we turned our cloffice into this beautiful, functional office space, click here!
NEED: A SECOND DESK

Like I mentioned earlier, I knew I wanted something that was real wood, had a timeless design, had at least one drawer for storage, and was light and open so that it would block the least amount of natural light possible. I had come across this natural wood campaign desk on World Market quite a few times in my search, and I kept coming back to it. I loved the natural wood tone, the classic design, and how light and open it was. It was also one of the most affordable options I found for a solid wood desk with this classic campaign style look.
After a very extensive search for the perfect desk, I had finally decided it was the one, so I hopped online to order it, only to find out it was sold out online and in our nearest two stores. I kept looking and looking (for probably 2-3 weeks) for a different desk that would work, but I never could find one that was just right. I almost settled for one I saw at a local furniture store, but then I got the notification that this beauty FINALLY came back in stock, and boy was it worth the wait! I’m so glad I didn’t settle for something else.
This desk retails for $299 + shipping… BUT I had a bunch of coupons and rewards that were enough to cover the cost of shipping and tax, so this guy came out to be exactly $301!
NEED: SPACE TO SLEEP TWO PEOPLE

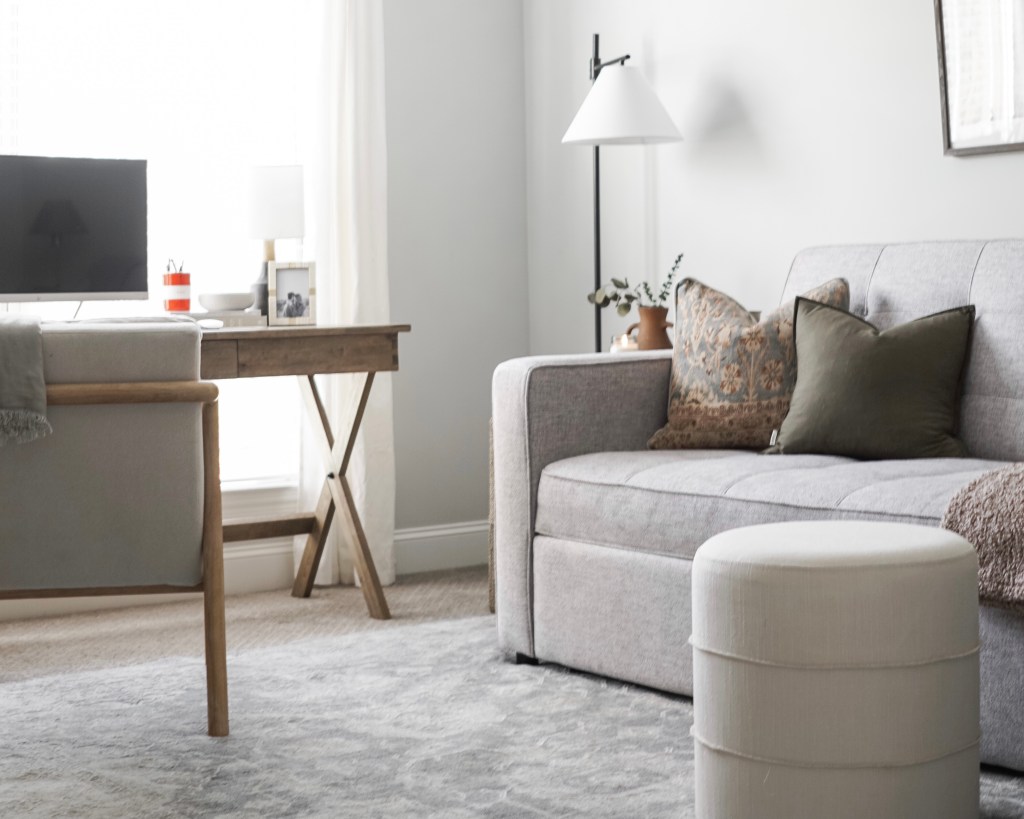
Okay, so you know how I felt about the daybed for this space… It was hard to keep made (because it was primarily used as a couch), it always looked messy, it was too big for the space, and it was a hard color to design around… BUT it was great in the sense that it slept two people comfortably, since it had a trundle underneath!
So what I needed was a queen sleeper sofa that was affordable, neutral, modern, and smaller than our daybed, but finding something that met all of these requirements was more challenging than I thought it would be. I told you earlier that I wanted to spend $500 max originally, which I quickly found out was unrealistic. So then I decided to increase that budget and see what the best bang for my buck would be. The problem I was running into budget wise was that a lot of sleeper sofas required you to purchase a mattress separately, which added at least another $100-$200 to the cost of the sofa. IKEA had some options that came with a mattress, but even then, the prices were $800-$1000 + shipping, since we don’t live near an IKEA.
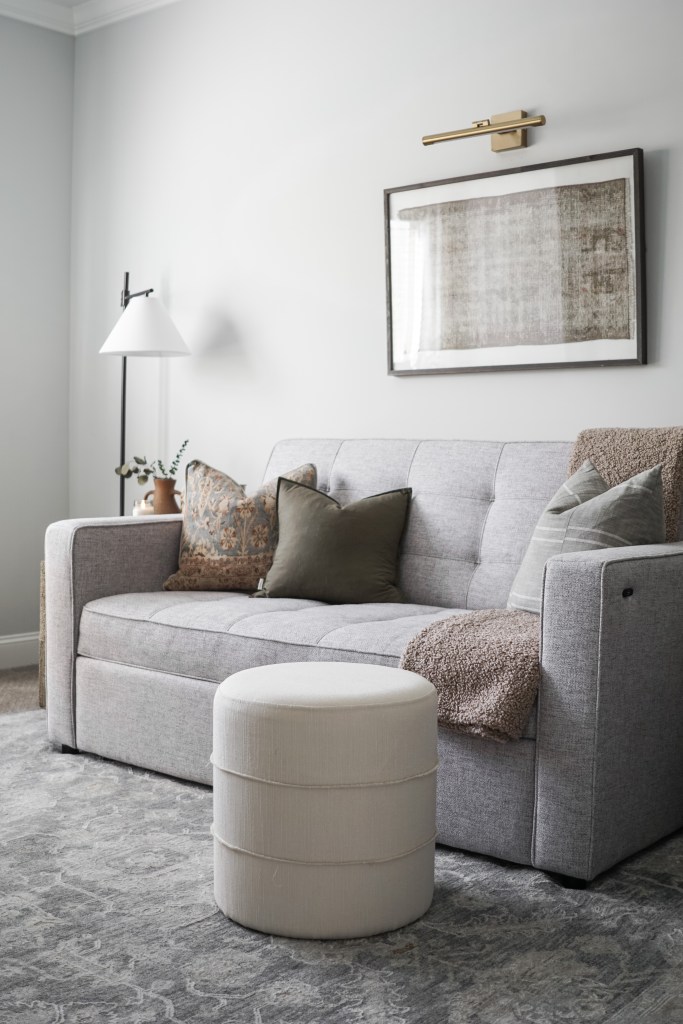
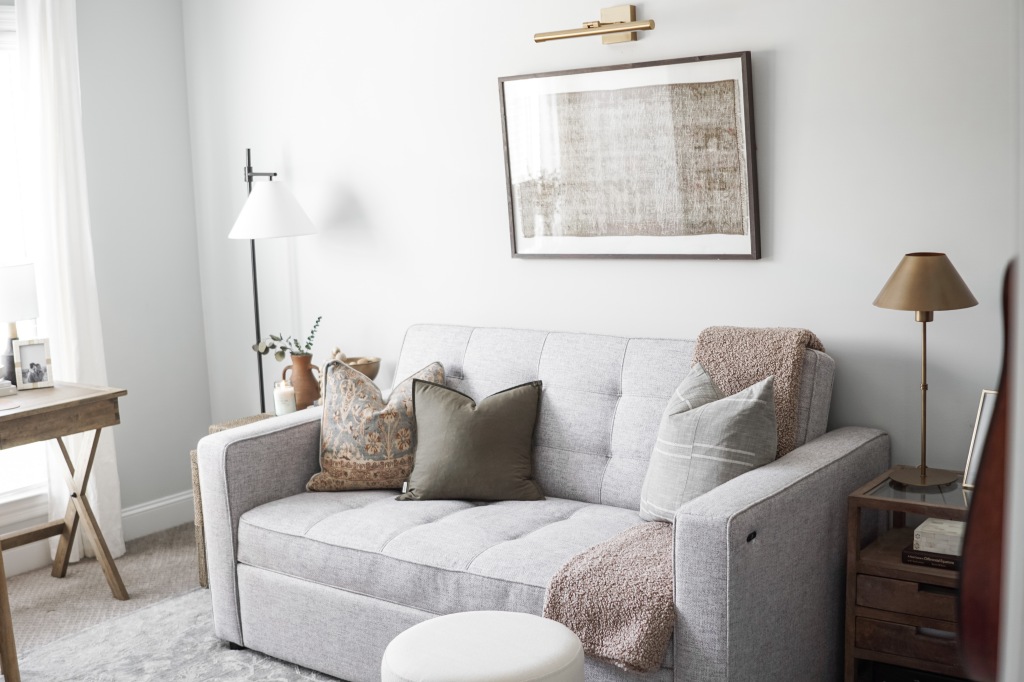
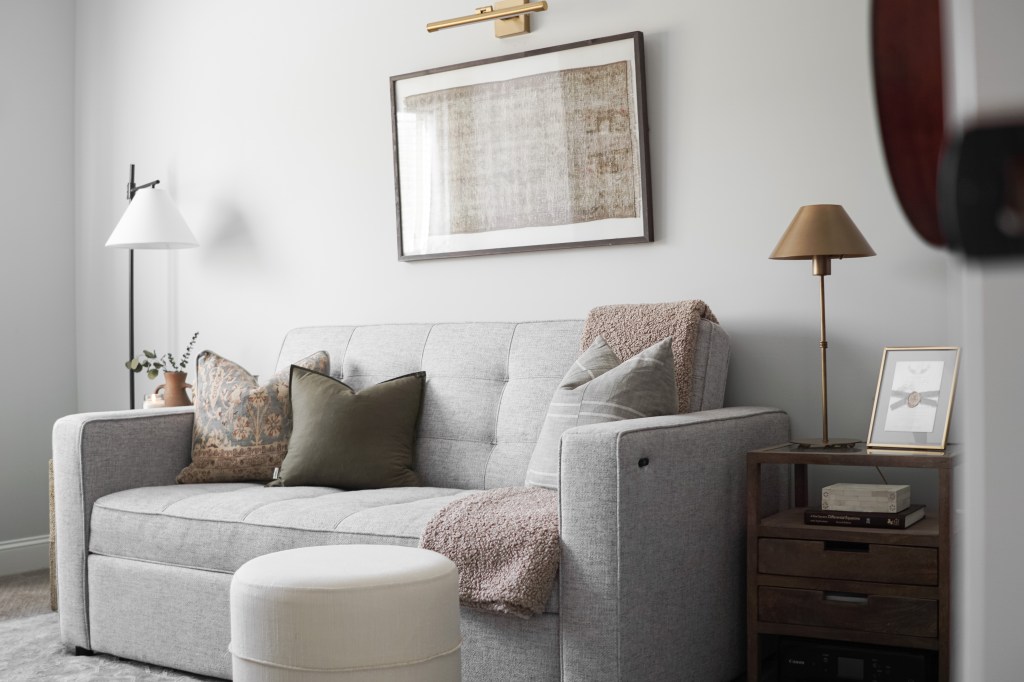
At one point, I thought I was just going to have to suck it up and pay more money to get what I wanted, but then I stumbled upon the Gray Brenden Sofa Bed on World Market!

So this bed is not well advertised as a queen sleeper sofa (you have to go deep into the details to ever find out that it is queen sized), so it doesn’t really show up when you search for something like “affordable queen sleeper sofas”. I happened to stumble upon it while browsing the World Market website for desks, and I am SO happy I did! This sleeper sofa met every requirement on my list and more:
- It is neutral, modern, and smaller in size than our daybed
- It pulls out into a queen sized bed, so it can sleep two people
- It was on sale for $699 when I got it (originally retails for $899)
- I didn’t need to purchase a mattress separately because the cushions themselves act as the mattress
- It has a built in USB port for charging your phone
- It reclines to 10%, 25%, and 75% in addition to laying out flat to become a bed
- You can just pull out the bottom and keep the back rest upright (or reclined) for watching TV or reading a book
- It is firm, but pretty comfy still for a sleeper sofa!

I seriously love this sofa in our space. It is the perfect budget-friendly solution for a smaller, multi-functional room. Since we’ve purchased it, I’ve seen it go on sale as low as $650, which is a steal! In addition to sales, World Market also offers coupons and rewards, and sometimes you are able to combine them with the sale price. Just sign up for their rewards program and you’ll be notified of sales and promotions by email, and you’ll earn rewards on your purchases! We were able to stack a coupon on top of the $699 sale price to get free shipping as well.
WANT: SLEEPER SOFA INSTEAD OF DAYBED

NEED: SPACE FOR JOHN’S COMPUTER TOWER AND CORDS SO THAT THEY ARE OUT OF SIGHT AND OUT OF MIND
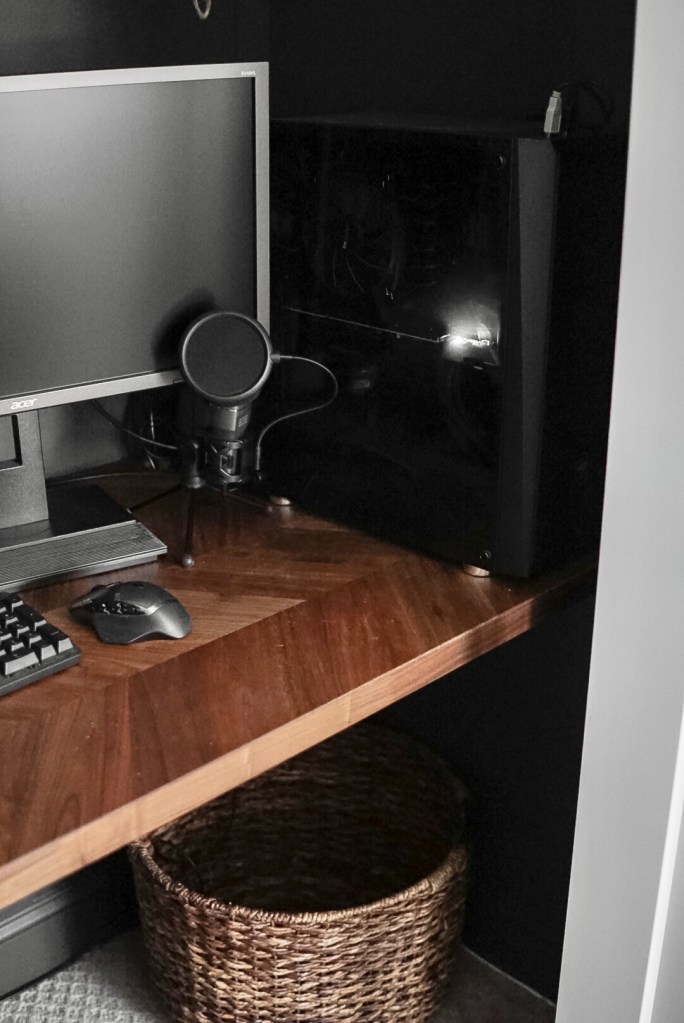
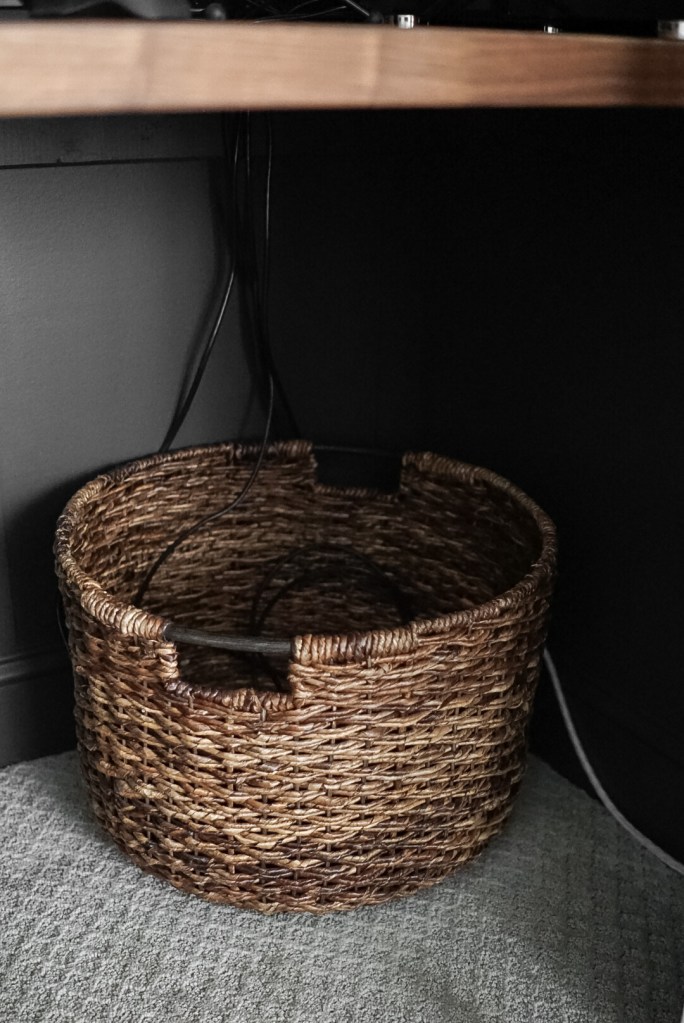

Another problem solved by the cloffice! I love being able to tuck the computer tower away so it is (essentially) out of sight, and we did our best to run the cords discretely through the back of the desk and hide them behind (and inside) this basket! You can read more details about this in the blog post found here. I also LOVE how the black monitors and cords blend in with the dark and moody wall color. It makes everything feel sleek and clean, unlike before when they stuck out like a sore thumb in front of the window.
WANT: A RUG TO BREAKUP THE SEA OF TAN CARPET
THIS RUG. It is seriously so beautiful. I love the way it complements the colors in the room, and breaks up the monotonous sea of wall to wall carpet. I know some people (including my husband) think it’s silly to put a rug on top of carpet, but I love the way rugs ground the space and create “zones” within a room! I think the rug really added the cozy factor to our office, all while bringing in some subtle colors, patterns, and textures to play off of in the rest of the room. If you are going to be placing a rug on top of carpet, I would highly recommend this double sided carpet tape to keep it in place and prevent wrinkles and ripples!
This rug was one of those items that kind of trickled in as I was designing and decorating the room. I knew I wanted an 8×10 rug, but I didn’t have anything specific in mind, so I was just waiting until I found the perfect one at the right price! This guy popped on Facebook Marketplace one day, new with tags, for $150, and knew it was the perfect one for our space! I actually bought this from another home decor enthusiast, House of Wahls, and she originally purchased it from Home Goods, so, if you’re on the hunt for something similar, I would check Home Goods (and TJMaxx.com and Marshalls.com).
WANT: A MORE NEUTRAL COLOR PALETTE AND TO HAVE COLORS, PATTERNS, AND TEXTURES THAT WORK TOGETHER TO CREATE A COHESIVE LOOK
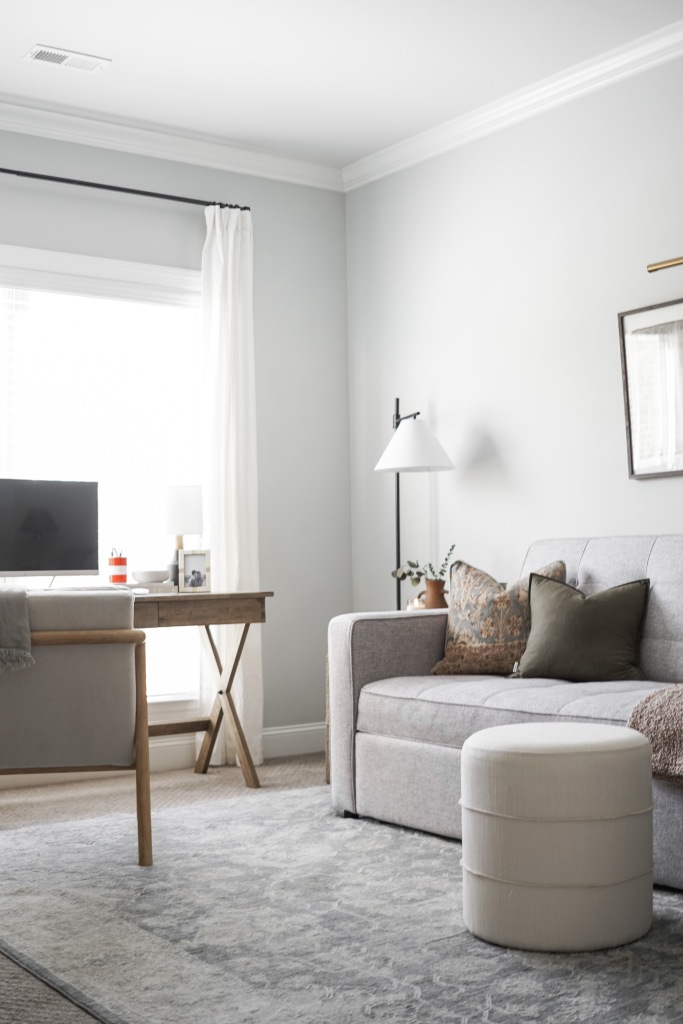
The thing that played the biggest role in creating a more neutral color palette for this room was getting rid of the royal blue daybed and replacing it with this heather gray sleeper sofa. By doing this, we created a neutral base that we could build on with textiles and accent decor to bring in colors, patterns, and textures that would create a cohesive look.
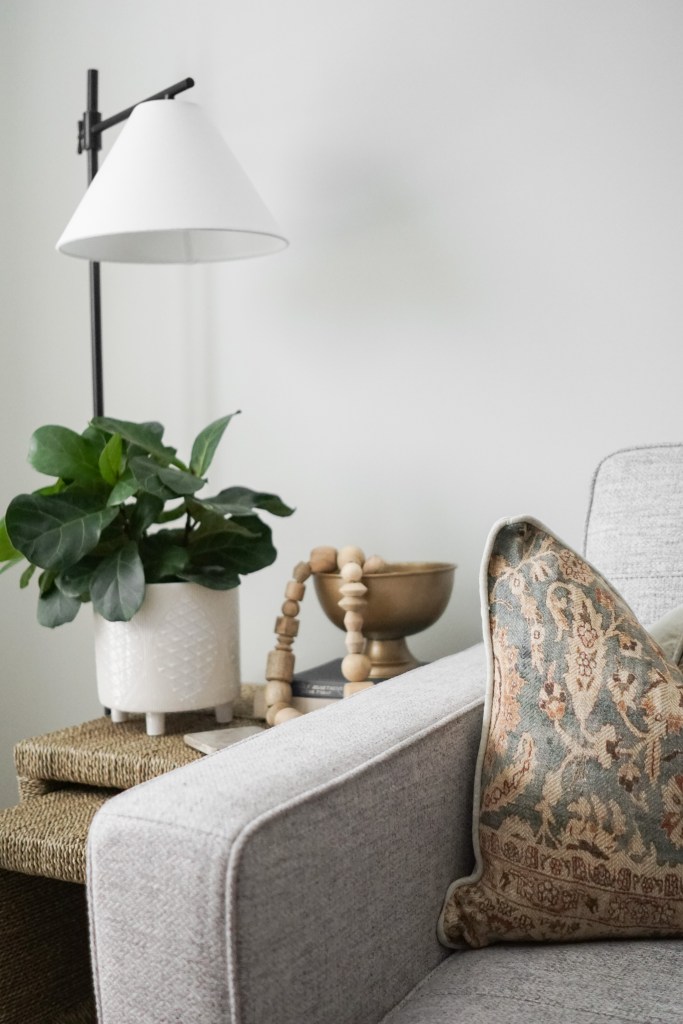

In terms of keeping things consistent and cohesive, I used repeated elements throughout the space to try to connect each individual section of the room together and make it flow. Some repeated elements you’ll notice here are gold and black metallic accents (lighting, hardware, curtain rod, cloffice desk chair), dark and moody pops of color (cloffice, diploma frames, and TV console), natural wood accents (desk, desk chair, stool), woven textures (cane, woven end tables, and leather pillow), greenery (on cloffice shelf, end table, desk, and stool), and muted textiles (rug, framed rug, pillows, blankets). All of these elements work together to tie this room together and keep the space feeling cohesive, despite there being so many individual sections of the room.

NEED: A DESIGNATED SPACE FOR THE PRINTER WITH EASY ACCESS

Another really awesome find that trickled in as I was designing this space. I pretty regularly scroll through the new arrivals section on TJMaxx.com, and one day, not too long after we started working on the office update, I came across this little side table! I’m not sure what it was that screamed “PRINTER STAND” at me when I saw it, but I knew immediately that it would be the perfect piece for our printer! It has the perfect sized drawers for holding extra paper, the perfect sized shelf to slide in our printer, and it also serves as an end table for the sofa. Its a win win win for me!
Besides the gorgeous mango wood and sleek design, one of my favorite things about using this as a printer table is how discretely it hides the printer while still allowing for easy access. All we have to do when we want to use it is turn it on and hit print (no need to even pull it out), and when we’re not using it, you don’t even notice it’s there!
This piece was $99, which is a pretty good deal in general for an end table, but especially for a solid mango wood one with so much storage!
NEED: TALLER TV CABINET WITH MORE STORAGE

The TV stand was really the last “big” piece of furniture we got for the room. I really wanted something a little taller than the average TV stand, but I needed it to be particularly thin due to the proximity of the door. I had my heart set on cane to tie in the woven textures on this side of the room, but I was really having hard time finding what I was looking for listed under “TV Stand” or “Media Console”. Then, one day I stumbled on this Holly and Martin Chekshire Anywhere Storage Cabinet on Target! At the time, it was on sale for $245, so it was super affordable, and exactly what I needed for this space! Although it is slim, the cabinet and drawers have SO much storage. We were able to fit seven different gaming systems (Wii, Switch, PS4, Nintendo 64, Game Cube, Super Nintendo, and Oculus Quest) in just the cabinet side alone, in addition to my camera and lenses. The drawers house all of of our extra cords, video games, and controllers, and, honestly, we still have plenty of room for more. The great part about the cane is that you could hide your cable box, apple TV, play station, etc. inside and still use them with the remote through the door.
WANT: NEW CURTAINS AND ROD

So if you recall from earlier, my beef with our curtain situation was as follows:
- Curtains look cheap
- Bulky finials on the end of the rod didn’t allow the curtain to extend all the way to the wall
There really wasn’t anything else I could do here other than buy new curtains and a new rod… so that is what I did!
I found a new rod with slim, flat finials at Dirt Cheap for $15 and spray painted it using my favorite rustoleum metallic spray paint. For the curtains, I splurged a little bit and got the Broadway Rod Pocket Curtains from Pottery Barn! These curtains come in a set of 2 (which is rare for somewhere like Pottery Barn) and were $89 for the pair.


Another thing that really made these curtains look much nicer than before was how I hung them. I used drapery pins and ring clips to get more of that designer look, and I documented the entire process in this blog post!

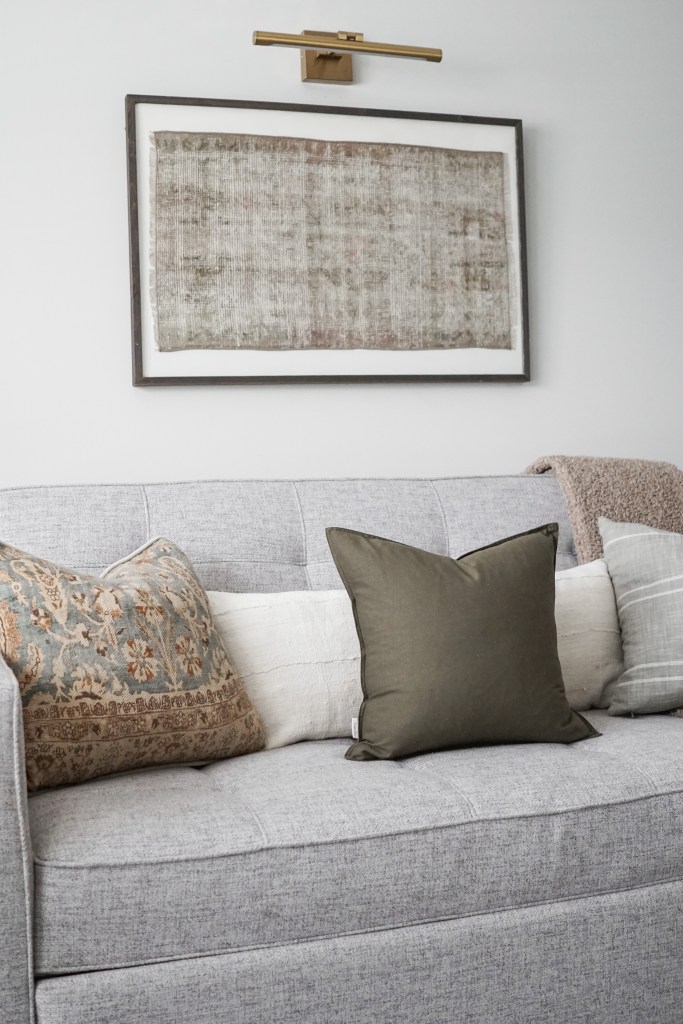
WANT: NEW ART OVER THE SOFA
My original plan was actually just to repaint the canvas we had over the daybed to be solid white with some texture, which I ended up doing, but it just didn’t feel right for this space 👇

I wanted something with a little more color that would add some warmth to the space, and thought this would be the perfect place to add in a framed textile! I have been seeing framed rugs and framed textiles pop up more and more over the last year, but the prices on some of them were outrageous. So, I did what any DIYer would do and I made it myself! All the details for this DIY can be found in this blog post! Total cost: $70.

WANT AND NEED: A SPACE THAT WAS AESTHETICALLY PLEASING AND COULD EASILY BE KEPT TIDY AND ORGANIZED

So all of the things I’ve mentioned thus far have contributed to this one. Turning the cloffice into a tidy, organized desk space for John, getting a TV stand with more storage, trading the blue daybed for a neutral sleeper sofa, and updating the furniture and decor in this space has really helped give it the cohesive, aesthetically pleasing look I was craving, and has made it much easier to keep things organized and tidy.
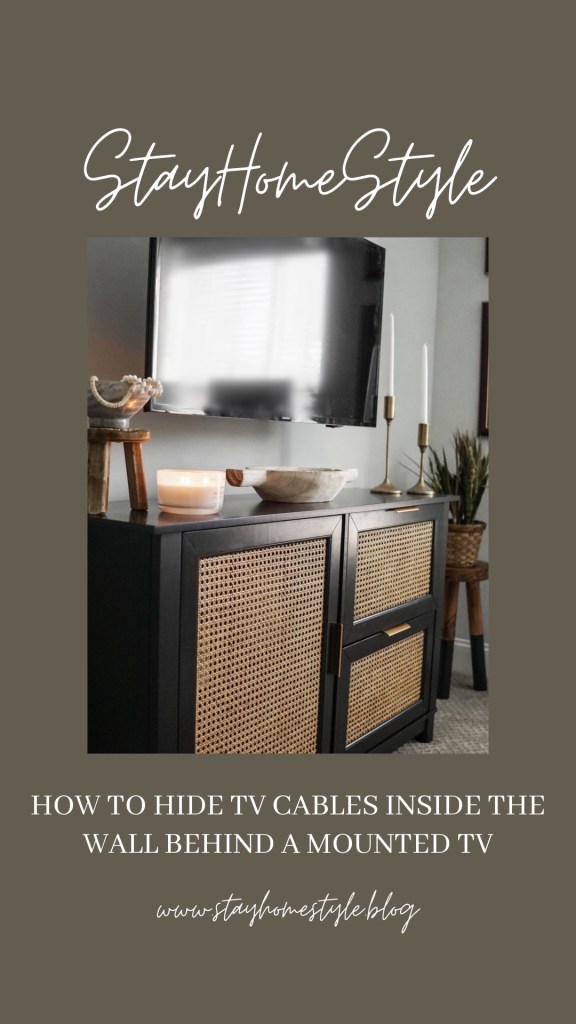
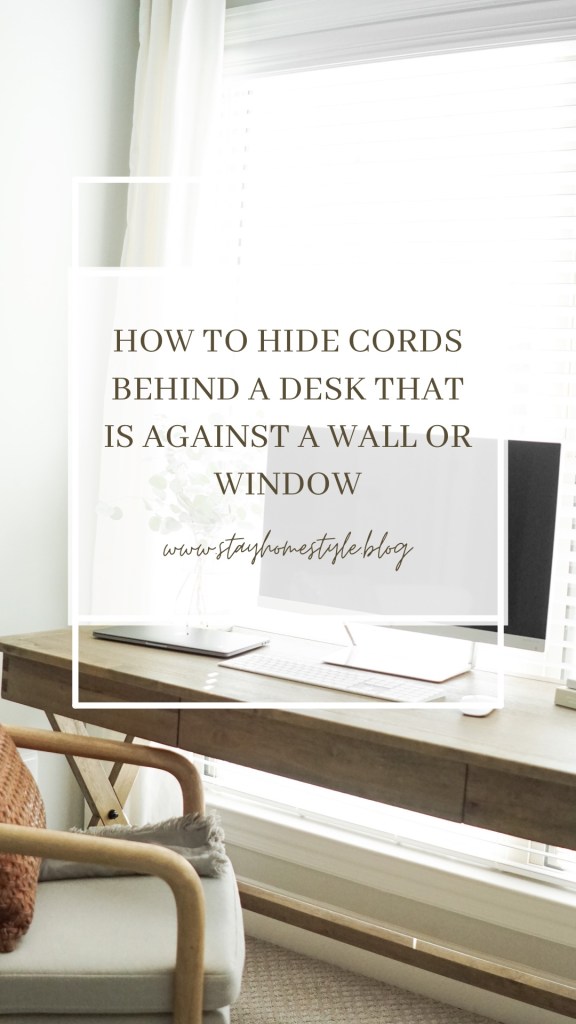
In addition, I did a lot of cord management in this space to keep things neat and clean. I talk about how I managed the cords for John’s computer in the cloffice blog post, but I wrote two more blog posts during this makeover on how to hide cords behind a desk that is against a wall or window, and how to hide the TV cables in the wall behind a mounted TV. Hiding and organizing all the cords in this space has really helped keep things looking clean and pretty, all while still being functional (maybe even more functional than before, because everything is organized)!

NEED: AFFORDABLE UPDATES AND FURNITURE THAT WON’T BREAK THE BANK
Throughout this entire process, I really tried to be mindful of how much we were spending, and to choose updates, furniture, and decor that wouldn’t break the bank. We didn’t really have a hard and fast budget, but a goal I had was to spend less than $1500 total on the updates. That may not sound super budget friendly to everyone, BUT, we made all of these updates over the course of three months, and we bought pretty much all new furniture! We also sold quite a few things (daybed, keyboard that was in the closet, old TV stand, filing cabinet, the IKEA shelves under John’s desk, and the wire shelving we took out of the closet), and made about $800 to put towards some of the new furniture we bought for the space!
I added it up, and I think in the end we spent right under $2000 on everything we bought, so subtracting the $800 we made from selling the old pieces, that puts us right around $1200 spent on furniture, updates, and decor!


SHOP
To shop items in each image, click on any item’s name under each photo.
Note, a lot of the items from Target or that have “similar” beside them actually came from Dirt Cheap, Facebook Marketplace, or thrift stores. I’ll include where I actually got each item below the images as well, just to give you some ideas of what you might find at some discount places for less!
MAIN WALL COLOR: SHERWIN WILLIAMS SILVERPOINTE
CLOFFICE WALL COLOR: BENJAMIN MOORE CHEATING HEART

SLEEPER SOFA // OTTOMAN // THROW BLANKET // FLORAL PILLOW // OLIVE PILLOW // STRIPED PILLOW (SIMILAR) // PICTURE LIGHT // FRAMED RUG (DIY, CLICK TO VIEW BLOG POST) // FLOOR LAMP // RUG (SIMILAR)
Sleeper Sofa –> World Market
Ottoman –> Target
Throw Blanket –> Dirt Cheap
Floral Pillow –> eBay
Olive Pillow –> Amazon
Striped Pillow –> Target
Picture Light –> Amazon
Framed Rug –> DIY (Hobby Lobby + Etsy)
Rug –> Facebook Marketplace

CEILING FAN // LIGHT KIT // CURTAIN ROD // CURTAINS // DESK // CHAIR // MONITOR
Ceiling Fan –> Richards Lighting
Light Kit –> Richards Lighting
Curtain Rod –> Dirt Cheap
Curtains –> Pottery Barn
Desk –> World Market
Chair –> Dirt Cheap
Monitor –> Amazon

LEATHER LUMBAR PILLOW (SIMILAR) // THROW BLANKET (SIMILAR)
Leather Lumbar Pillow –> TJ Maxx
Throw Blanket –> TJ Maxx

LAMP // FRAME // BOWL (SIMILAR) // HOME MADE LOVELY // ABODE
Lamp –> Facebook Marketplace
Frame –> Amazon
Bowl –> Target (use to be a candle)
Pencil Cup –> Thrift Store
Home Made Lovely –> Amazon
Abode –> Amazon

TV STAND // WOODEN DECORATIVE STAND // POTTERY BOWL (SIMILAR) // SMALL BEADS // WOODEN BOWL (SIMILAR) // GOLD CANDLE STICKS // THREE LEGGED DIP DYED STOOL
TV Stand –> Target
Wooden Decorative Stand –> The Little Merchant
Pottery Bowl –> Odyssey Clay Works
Small Beads –> Etsy
Wooden Bowl –> Dirt Cheap
Gold Candlesticks –> Facebook Marketplace
Three Legged Dip Dyed Stool –> TJ Maxx

DESK CHAIR // BUTCHER BLOCK // SCONCE // LOW TIDE PRINT // FAUX FIDDLE
Desk Chair –> Facebook Marketplace
Butcher Block –> Facebook Marketplace
Sconce –> Amazon
Low Tide Print –> Collection Prints
Faux Fiddle –> Big Lots

TRASH CAN // PRINTER TABLE (KINDA SIMILAR) // BONE BOX (SIMILAR) // GOLD LAMP
Trash Can –> Target
Printer Table –> TJ Maxx
Bone Box –> TJ Maxx
Gold Lamp –> Dirt Cheap

WOVEN NESTING TABLES // GOLD PEDESTAL BOWL (SIMILAR) // WOODEN BEADS // HOMEBODY // MAKE SOMETHING GOOD TODAY // STONE COASTER
Woven Nesting Tables –> Dirt Cheap
Gold Pedestal Bowl –> Vintage 72
Wooden Beads –> Target
Homebody –> Target
Make Something Good Today –> Amazon
Stone Coaster –> Dirt Cheap
That’s a pretty detailed overview of how we achieved all of our wants and needs for this space on a budget! Like I said earlier, this may or may not sound like a budget friendly makeover to you, and I think that is because everyone has different spaces and budgets to work with. I do hope regardless of actual numbers, that all the details in this post and the thought process behind this makeover will inspire you, encourage you, and help you transform the spaces in your own home that aren’t meeting your needs, whether that be functionally, aesthetically, or both!
Thank you for reading! 🙂


16 responses to “BEFORE AND AFTER: HOW WE CREATED A FUNCTIONAL AND INTENTIONALLY DESIGNED OFFICE AND GUEST ROOM COMBO ON A BUDGET”
This was exactly the inspiration I was searching for! So happy I came across this! I also have a small space for mixed use and have been really struggling for a plan. Thank you for being so detailed, this helps so much!
LikeLike
This makes me so happy to hear!! I’m so glad that this was helpful for you! Mixed use spaces can be so difficult to deal with for sure! Thank you for commenting and telling me this, it means a lot to me 🙂
LikeLike
Hi! This is beautiful. I’m loving every single detail. I think I can get away with the same look in ours, but it feels cramped (currently empty and starting from scratch) and I’m having a hard time visualizing. Can you let me know the dimensions of the room? Thanks.
LikeLike
Hi there! So sorry for the delayed response to this. I just measured and this room is roughly 12’x13’! I hope this helps!
LikeLike
[…] home office like a room of classy grey walls and matching decor. This simple home office setup from Stay Home Style is elegant and free from distractions, and can easily double as a guest room thanks to the […]
LikeLike
Thanks for sharing! Love all of these ideas ☺️
LikeLike
[…] like a room of elegant gray partitions and matching decor. This easy dwelling workplace setup from Stay Home Style is elegant and free from distractions, and may simply double as a visitor room because of the handy […]
LikeLike
[…] of stylish gray partitions and matching decor. This straightforward residence workplace setup from Stay Home Style is elegant and free from distractions, and may simply double as a visitor room because of the handy […]
LikeLike
[…] home office like a room of classy grey walls and matching decor. This simple home office setup from Stay Home Style is elegant and free from distractions, and can easily double as a guest room thanks to the […]
LikeLike
I love this, so thank you for sharing! Any chance you know the brand of the rug (from a tag or something) so I can keep an eye out?
LikeLike
Hi there! Thank you so much! The rug brand is SURYA! I bought it on Facebook Marketplace, but the girl I bought it from found it at home goods! 🙂
LikeLike
Thank you! I wish I knew the item number. Good image isn’t working 😊
LikeLike
Google*
LikeLike
I love this room setup, thank you for going over every single detail and I’m excited to have a similar setup as well, what’s the paint color you used for the room?
LikeLike
Thank you so much for taking the time to read! I’m glad you found it helpful! The paint color in this space is Sherwin Williams Silverpointe!
LikeLike
[…] source source […]
LikeLike