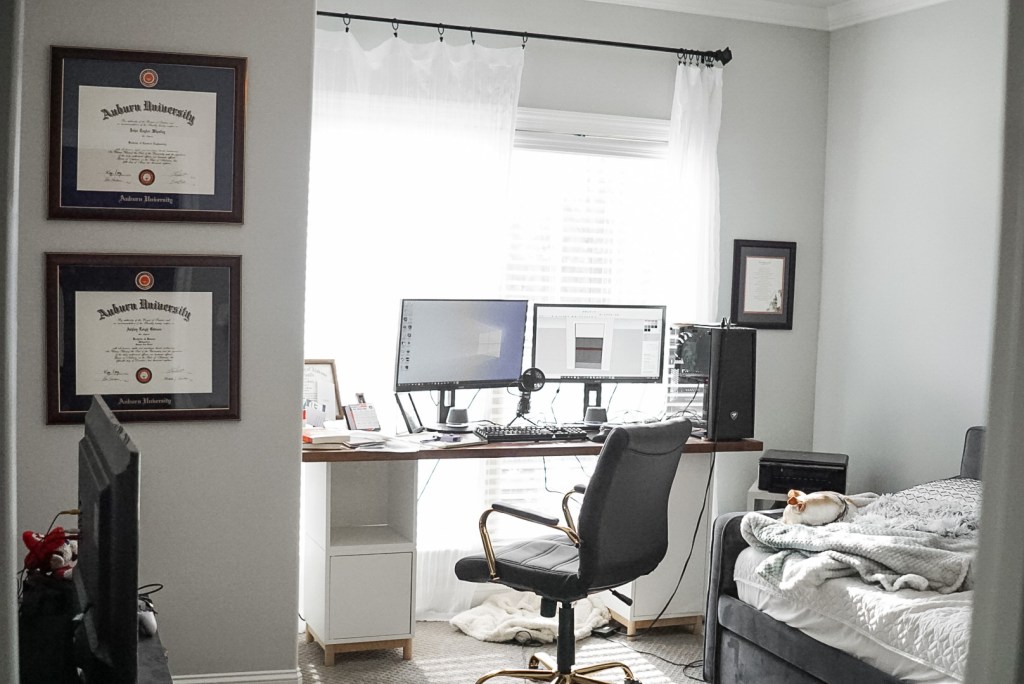
2020 may be officially over, but, for a lot of people, working from home is not! Since working from home has become the new norm, and I’ve been spending a lot more time on the computer working on Stay Home Style, we decided it was time to update our home office space and make room for another desk.
We have honestly neglected this space on the design side of things. It has certainly been functional for us over the past year, but I’m excited to finally give this room the attention it deserves, and make it an office for two!
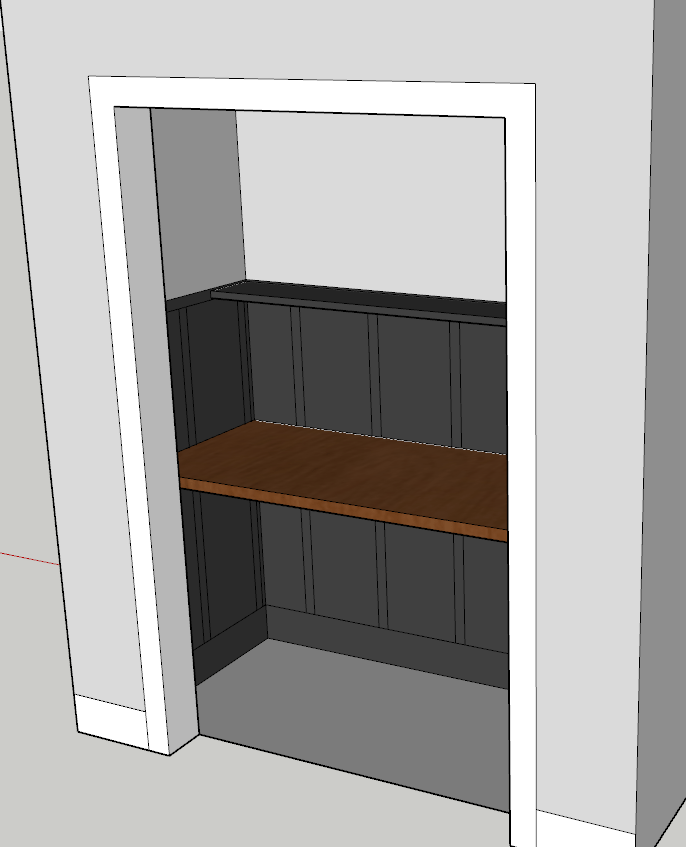
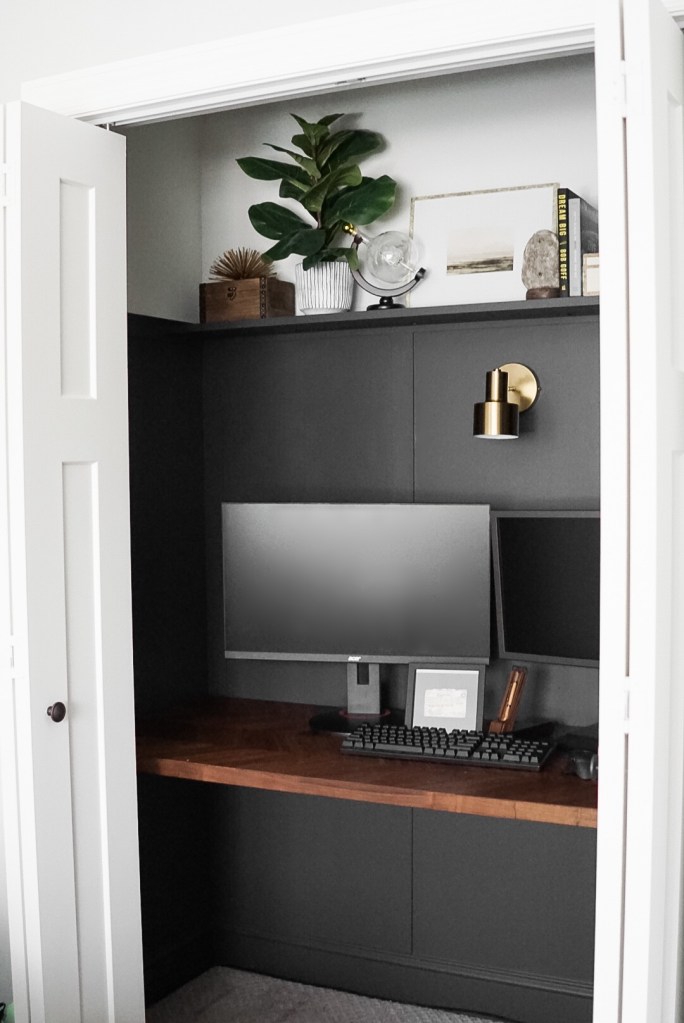
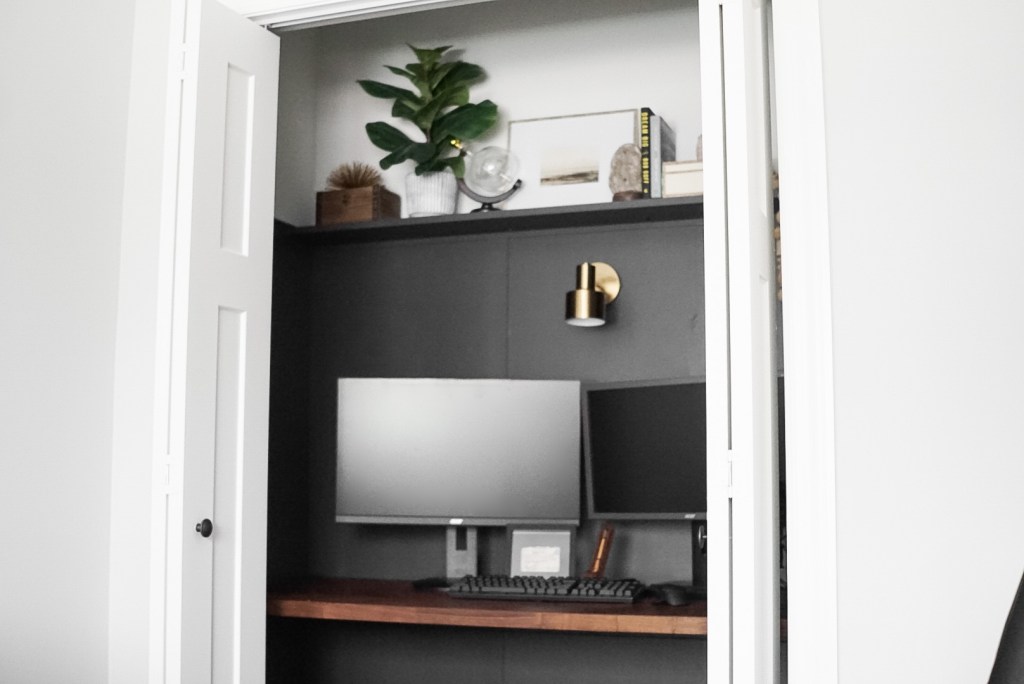
With that being said, our first order of business was figuring out how to maximize the space in this room. This room functions as an office, second guestroom, and video game room, so maximizing the available space is essential to making this work as an office for two. At first, we wanted to do built in shelving along the wall where the TV is that would function as a space for the TV and as a second desk. Unfortunately, built-ins can get costly very fast, and, to be honest, I was a little scared to mess with our crown molding 🙈 So, I went for the next best thing… A CLOFFICE!
In this blog post I’ll be sharing all the details on how we turned this messy, catch all closet into a pretty AND functional office space!
Disclaimer: Some links contained in this post are affiliate links. That means that if you click on the link and purchase an item, I get a small percentage of that sale at no extra cost to you. As an Amazon Associate I earn from qualifying purchases. Please know that products and brands recommended here at stay home style are products that I use, love, and trust.
WHAT YOU NEED

click on the underlined words to view products
TOOLS
- Drill – This will be used to remove existing shelving, screw in the supports for the desk, and screw in the floating shelf above the desk.
- Hole Saw Drill Bit – This will be used to drill a hole in the desk for cords.
- Circular Saw – This will be used to cut the butcher block down to size.
- Miter Saw (optional) – We used the miter saw to cut our lattice molding. You could also use the circular saw for this.
- Saw Horses – This will be used to hold the butcher block while you cut it down to size.
- Brad Nailer – This will be used to attach the lattice moulding to the wall.
- Pocket Hole Jig and Screws – This will be used to attach the floating shelf to the wall.
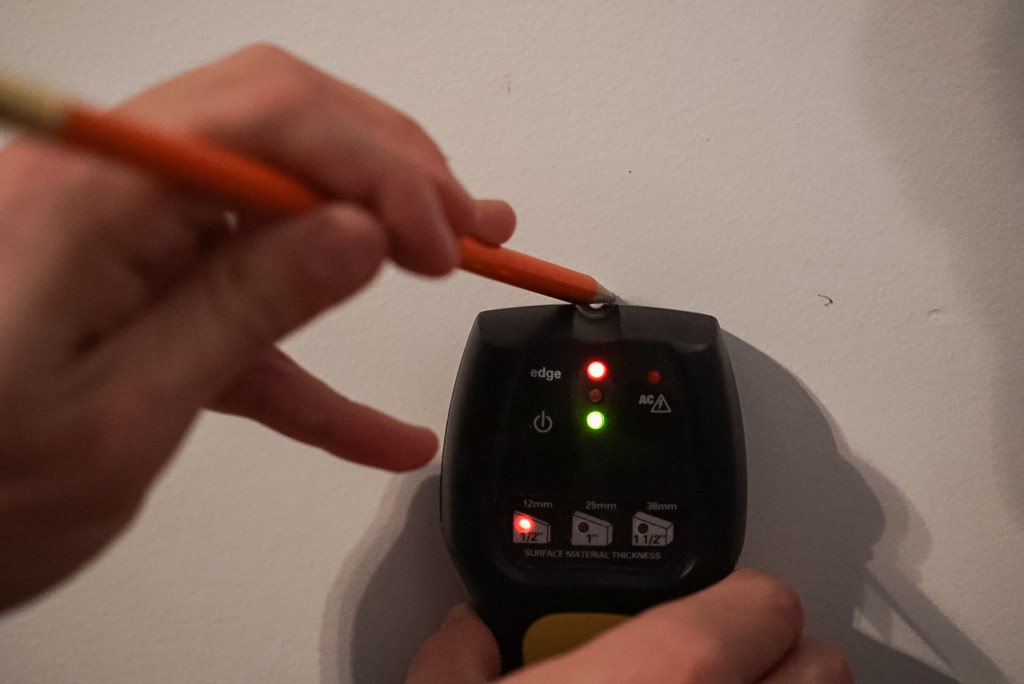
- Stud Finder – This will be used to find the studs to attach the desk supports to.
- Level – This will be used to level all boards, supports, shelves, etc.!
- Measuring Tape – This will be used to plan and space all moulding and supports.
- Wood Clamps – These will be used to hold down your guide when cutting your butcher block.
WOOD
- Lattice Moulding – This will be used to create the board & batten detail. We used four pieces of quarter inch thick 2.25″ x 8′ pine lattice moulding. The amount you need will be dependent on how big your closet is and how close together you want your boards to be.
- 2×4 Pine Stud – This will be used as the support for the floating butcher block desk. The amount you will need depends on how large your desk is.
- 1×8 Pine Board – This will be used as the floating shelf above the desk. The amount you need depends on how big your closet is.
- Butcher Block – This will be used as the desk top. You could also use a free standing desk if you didn’t want to make a butcher block floating desk!
PAINT & SUPPLIES
- Spackling – This will be used to fill in any holes created by removing the existing closet shelving, and to fill in the brad nail holes in the lattice molding.
- Sanding Block – This will be used to sand down the spackling once it is dry.
- Paint – You will want two different colors (a dark and light) if you’re going for the look we have! We used our existing closet wall color as the light (Sherwin Williams Silverpointe, lightened to 1/3) and one quart of the dark paint (Benjamin Moore Cheating Heart). Most home improvement stores like Lowes or Home Depot can color match Benjamin Moore paint, even if they don’t sell it.
- Paint brush and roller – I would recommend using a good quality roller for a smooth finish!
- Paint Tray – This is a necessity if you’re using a roller.
- Painter’s Tape – This will be used to keep clean lines between the different paint colors and protect the floor and any trim that will not be painted.
- Caulk – This will be used to fill in gaps or cracks between the lattice molding and the wall. Make sure to get the kind you can paint!
HOW TO GET THE LOOK
1. MAKE A PLAN
Before you start shopping for supplies and wood, you need to measure your space and make a plan. Originally, I had planned to do eleven 1.5″ vertical panels 48″ off the base boards that were spaced 11″ apart (as shown above). I ended up changing my plan last minute (like literally at Lowe’s while picking out the wood) because I saw a wider 2.25″ lattice moulding that I thought would look better! Since I had measured and planned before hand, however, I was able to do some quick math on the spot and adjust my plan to work with the wider piece of moulding!
I also decided to forgo the panels on the side walls for two reasons:
- You won’t really see them, so it was a good place to save some money!
- Since the desk fits snug from wall to wall, adding the side panels would have required us to install the desk prior to adding the top vertical pieces (and prior to painting), which would have made things very difficult.
In addition to those changes, we also decided to make our paneling taller than 48″ off the base boards. This was solely to cover up as many holes as possible that were left from removing the existing wire shelving.
So basically, the only things I kept from my original plan were the main ideas and the colors… so hopefully my mistakes help you make a better plan from the start 😂
One more thing you should consider when picking out your lattice moulding is thickness. Our baseboards are .25″ thick, so we wanted to be consistent by choosing moulding with the same depth. The main thing you want to avoid is choosing a moulding that is noticeably thicker than your baseboards. This will look awkward and unintentional.
2. GATHER YOUR SUPPLIES

Once you have a plan and know how much wood you need, gather your supplies! You can get most, if not all, of the things you need at your local home improvement store! I would also check Facebook Marketplace if you’re looking for tools or wood for less. We found our butcher block (originally $249 from IKEA) on Facebook Marketplace for just $60!
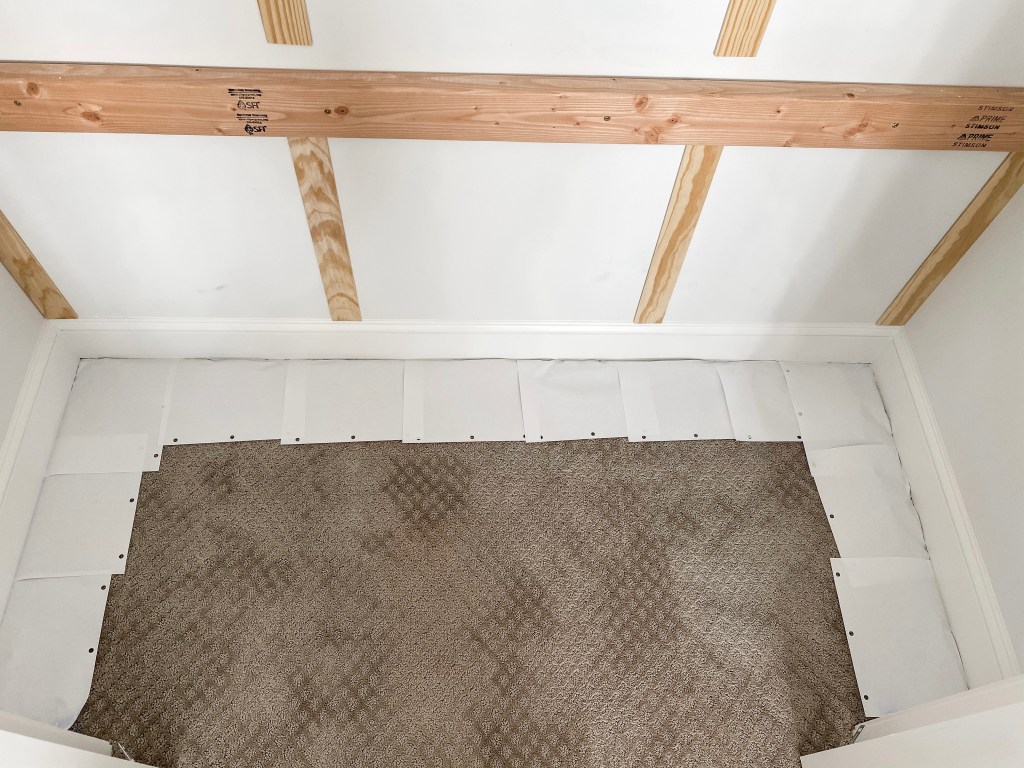
3. REMOVE EXISTING SHELVING & FILL HOLES

If you’re closet already has existing shelving, the first step is to remove it and fill in the holes. Keep in mind that closet shelving can leave MASSIVE holes in the wall, so the spackling can take a very long time to dry completely. I would recommend removing the shelving the day before you plan to start hanging up the paneling so you can allow the spackling to dry overnight.

Once your spackling is dry, use your sanding block to sand it down smooth and flush with the wall. This step is important, because filled holes are often still noticeable under paint. The better job you do of filling and sanding your holes, the smoother your paint finish will appear at the end!
4. PAINT YOUR LIGHT COLOR ON THE WALL
If you’re using your preexisting wall color, this will mainly just be touching up where you filled in the holes. If you’re painting with a completely different wall color, you will want to measure off and just paint the top portion of your closet with the new lighter color.
5. HANG ALL HORIZONTAL BOARDS

To start your paneling, you will want to hang all horizontal boards first. Horizontal boards will include your top lattice moulding piece and the 2×4 studs that serve as the desk supports.
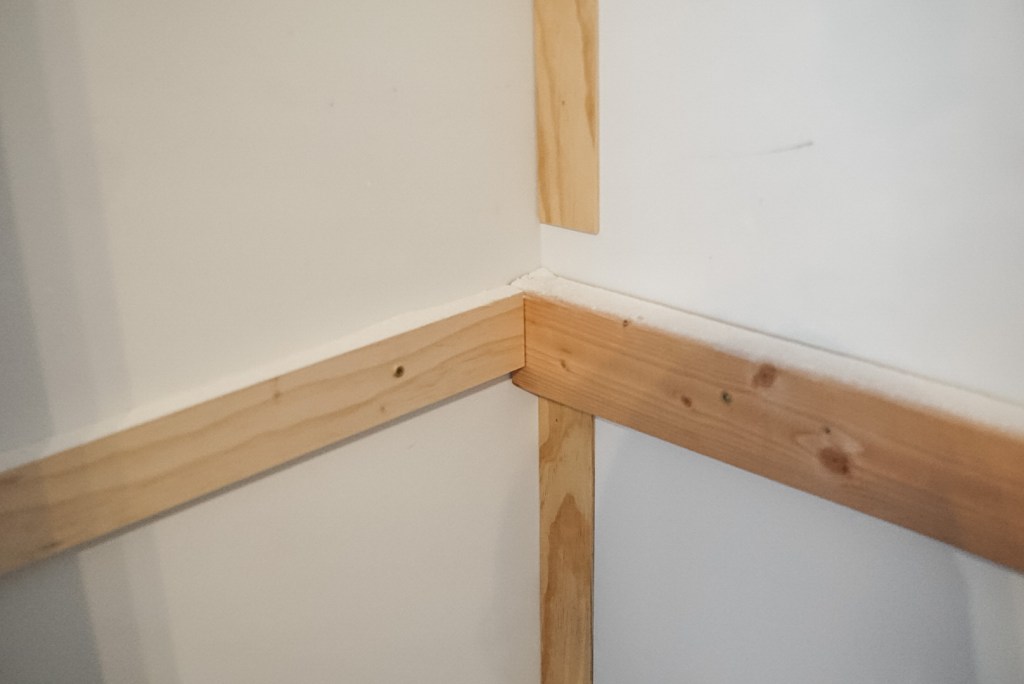
To start, measure your walls and cut your lattice moulding to the exact length of each wall. You want the paneling pieces to sit flush against each other, so take into consideration the thickness of the moulding as well. We used a miter saw to cut our lattice moulding, but you could use a table saw or circular saw as well!
Once you have your moulding cut down to size, you are ready to hang! This is a two person job. Starting with the longest wall, level your board. Have one person hold the board level and in place, while the other uses the brad nailer to attach it to the wall. Since the lattice moulding bears no weight, it is not important that it be nailed into studs, so just attach it with a enough nails so that it feels secure.
Once you have the horizontal lattice moulding in place, cut and hang the supports for the desk. Since the desktop will be very heavy, you will need to attach the supports directly into the studs. Using your stud finder, find and mark all studs slightly above where you will hang the supports.
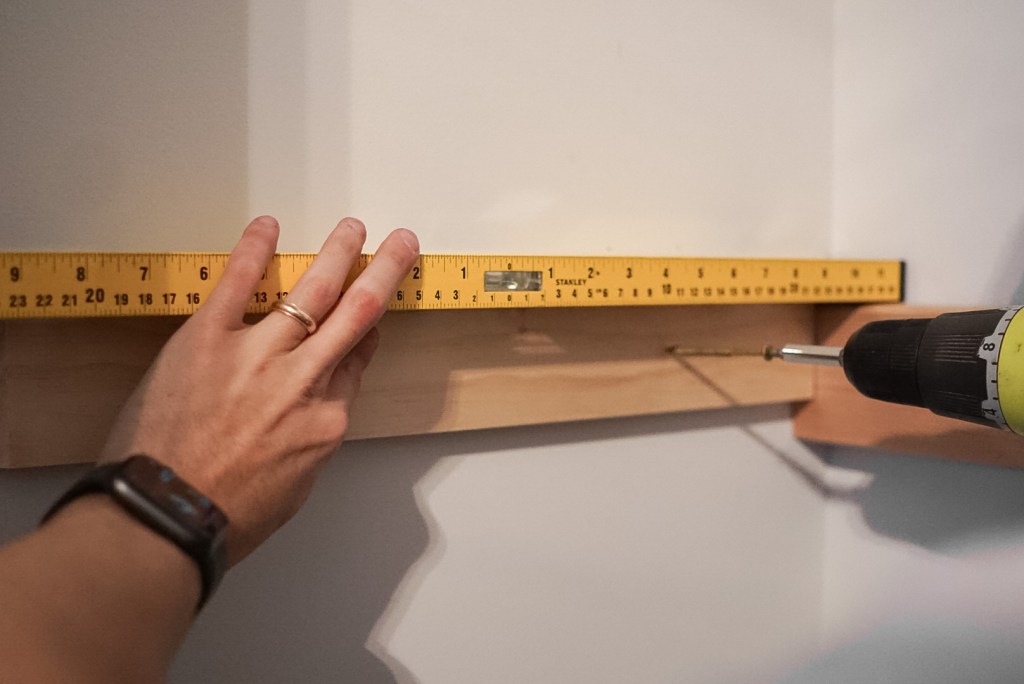
Once you have your studs marked, cut your supports down to size. You will want the longest support (supporting the full width of the desk) to run wall to wall. The side supports should be just a little shorter than the depth of your desk so they are not seen. We cut our side supports to be about 4″ shorter than the depth of the desk.
Once you have the boards cut, level and drill the supports into each stud. Butcher Block is EXTREMELY heavy, so you want to drill the supports into as many studs as possible. When leveling the supports, it is important to level the boards on the wall AND with each other (as shown in the right photo above). If you’re supports are not level with each other, your desk itself will not be level.
If you’re looking for more guidance for hanging a floating butcher block desk, this blog post from The Navage Patch is a great resource!
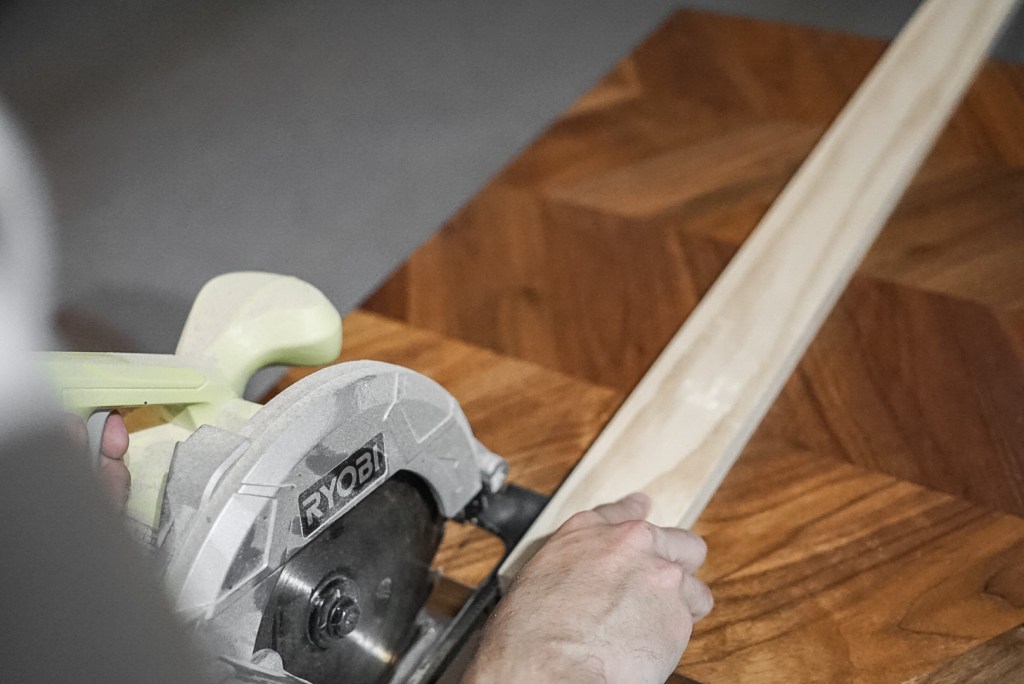
6. CUT YOUR BUTCHER BLOCK
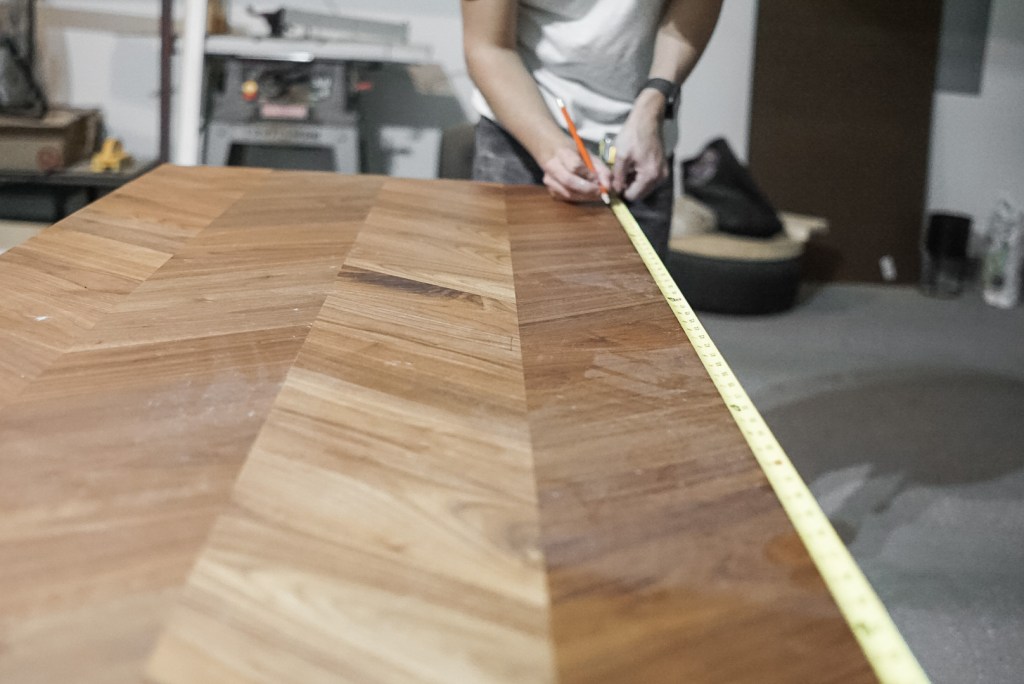
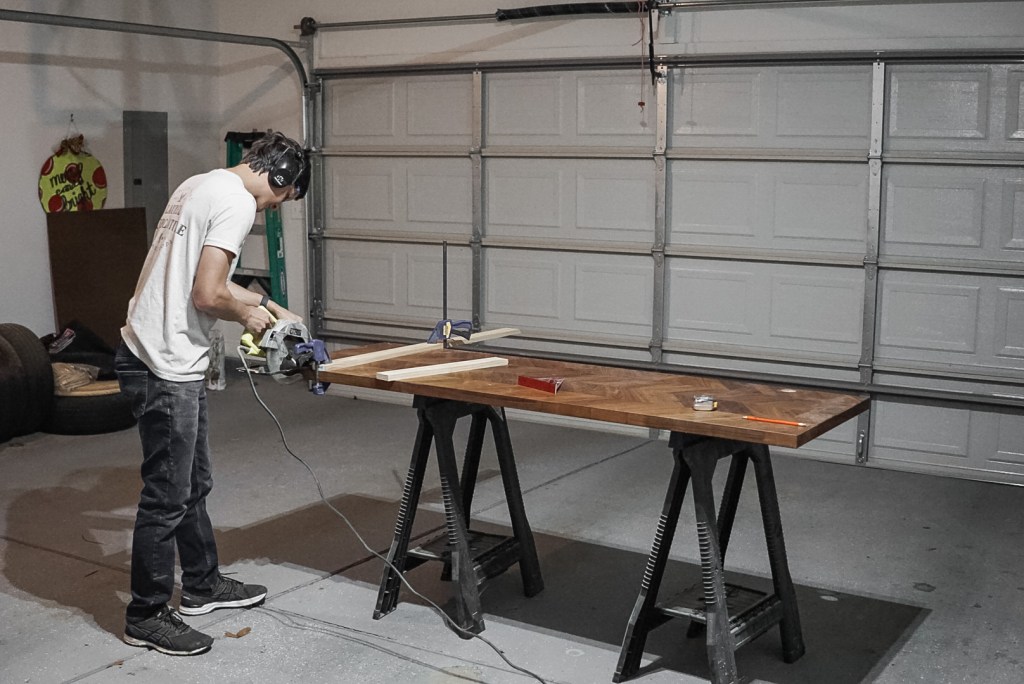

The next step is to cut your butcher block down to size! Measure twice, cut once is the rule here. Butcher block can be pretty expensive, so you want to make sure you don’t cut it too short. It needs to fit exactly wall to wall to be properly supported by the 2×4 studs you installed in the previous step.
To cut, place your butcher block on 2-3 saw horses and measure where you need to cut. To make sure you get a straight cut, take a scrap piece of wood and level and clamp it along your butcher block as a guide. Using a circular saw, carefully cut the butcher block down to size.

If you plan on having a lot of cords, I would advise using a hole saw drill bit to cut a small, circular hole in one of the top corners. This will allow you to neatly run your cords all to one place, since you won’t be able to run anything behind the desk.

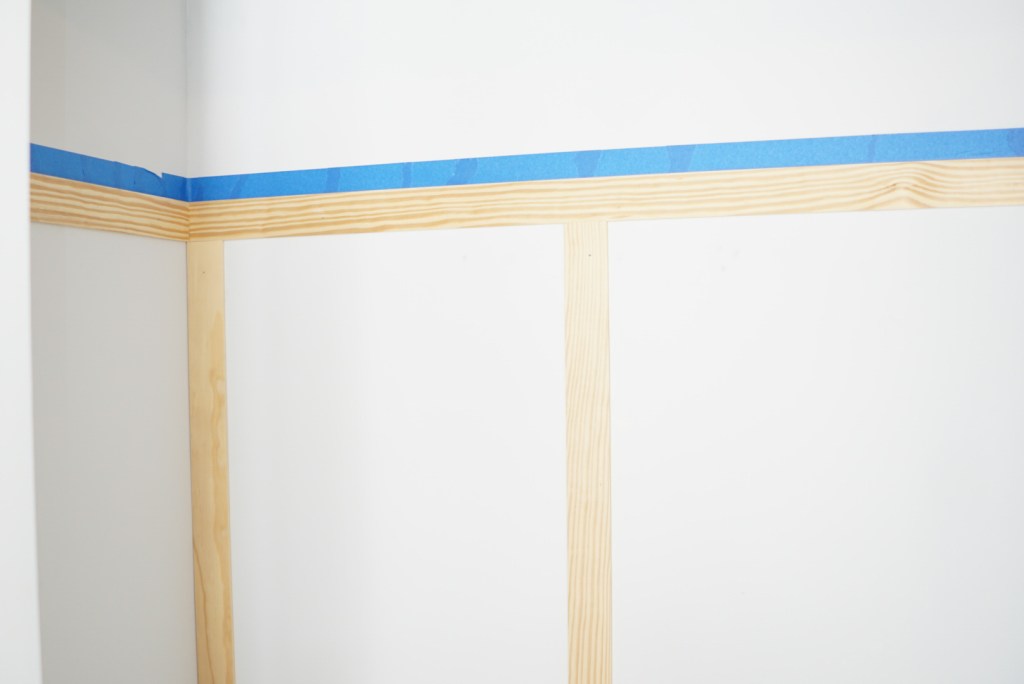
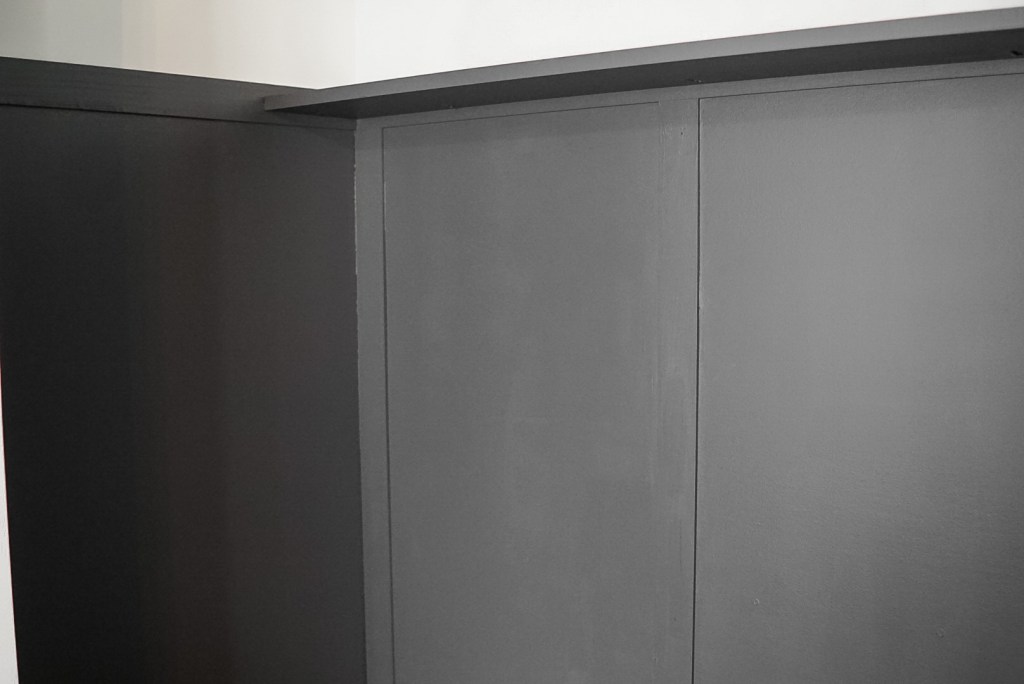
7. MEASURE, CUT, & HANG THE VERTICAL BOARDS
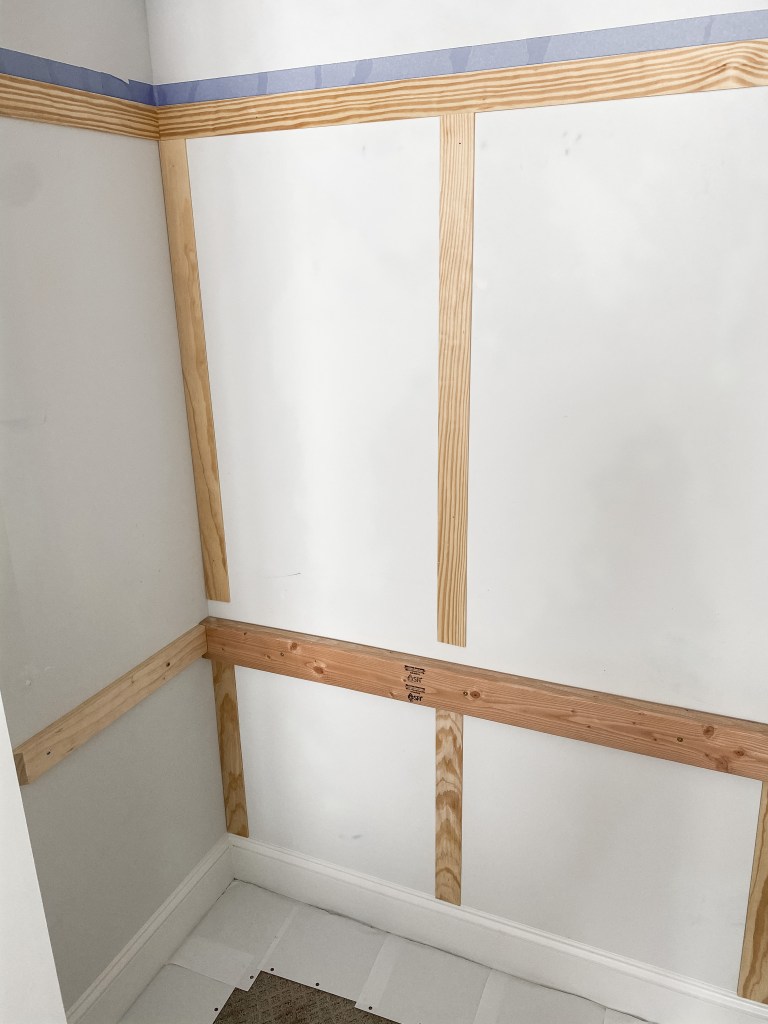
Once your desk is cut down to size, the easiest way to measure for your vertical paneling is by putting in the desk. You want to desk to rest flush against the wall, so the vertical lattice moulding will need to be cut into two separate pieces. Measure the distance from the bottom of the horizontal boards and the top of the desk to get the length of the top pieces. Once you have those measurements, I would remove the desk from the closet. It is much easier to work without it there. To get the length of the bottom pieces, measure from the top of the baseboards to the bottom of the desk supports.
Once you have all of your measurements, cut your lattice moulding down to size and hang them according to the spacing plan that you determined in step one. As with the horizontal boards, have one person hold the boards level and in place, while the other person uses the brad nailer to secure the moulding to the wall.
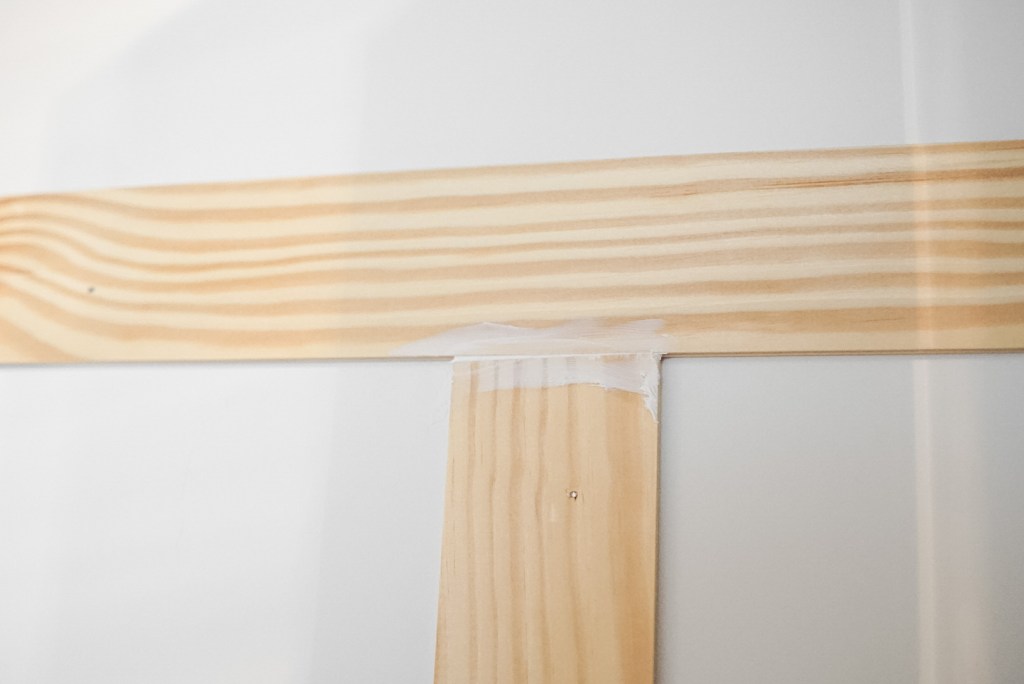
Now, that all lattice moulding is installed, fill any gaps or cracks between the wall and the wood with caulk. This helps give you a smooth paint finish at the end. You won’t need to caulk every edge of every board, only the places where you see gaps or cracks.
I would also recommend filling all of the brad nail holes with caulk or spackling and sanding them down. They are tiny, but still visible after painting if not filled in.
8. TAPE OFF YOUR EDGES & PAINT THE DARKER COLOR ON THE WALL

To protect your light colored portion of the wall from getting any unwanted dark paint streaks, apply painter’s tape along the horizontal lattice moulding. Also apply painter’s tape to any trim, moulding, or base boards that you do not wish to paint. We painted our base boards to match the dark wall, so we only taped off the trim and above the horizontal lattice moulding. To protect our flooring, I used sheets of paper slid underneath the baseboards. This worked great for protecting the carpet, but I did have to remove some stuck paper with tweezers when it was all over. You could also use plastic secured with painter’s tape for this!
Once you have all of your tape up, you can start painting! I would highly recommend using a good quality roller to get a smooth paint finish. If I could do this all over again, I would have filled in my holes better, and bought a better paint roller! We ended up doing two coats of paint, and were able to do the entire project with just one quart of dark paint.
9. CUT, PAINT, & INSTALL THE FLOATING SHELF

While the wall is drying, cut and paint the 1×8 pine board to serve as a floating shelf at the top of the board & batten. You should already have the measurement of the longest wall from hanging the horizontal board, but don’t forget to account for the thickness of the lattice moulding.
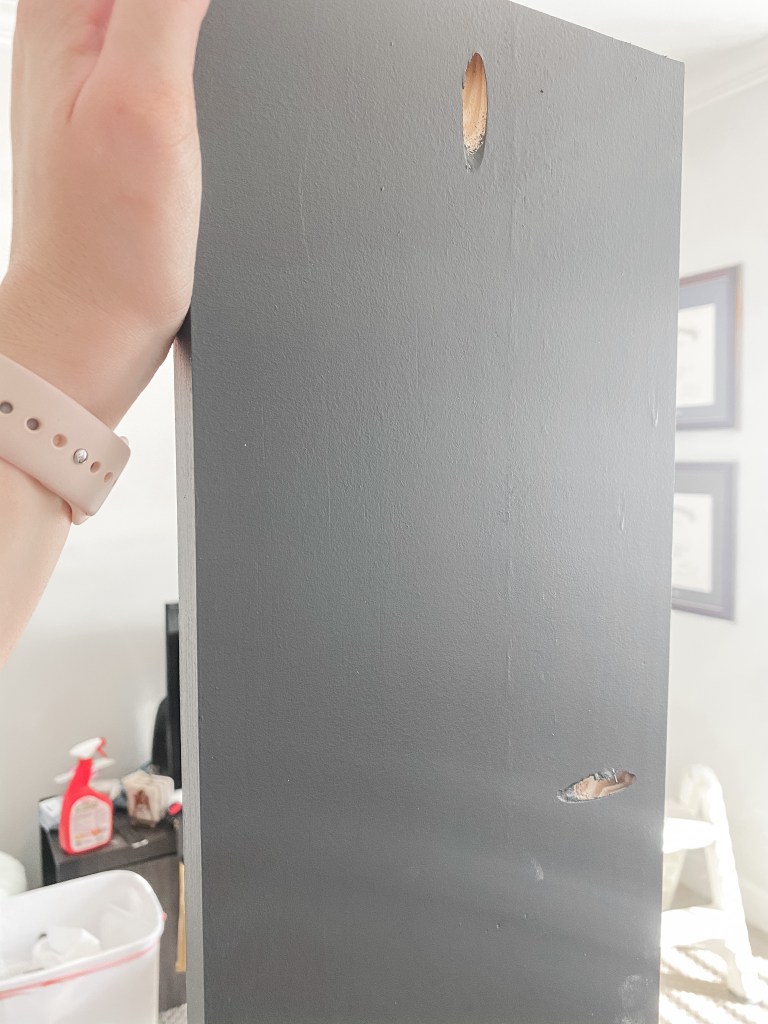
Once you have your board cut down to size, measure out the placement of your pocket holes. You will want to get the measurements of each stud along the back and side walls and mark these on the shelf. Using the pocket hole jig, make pocket holes at each of these marks. You will want to attach the board to studs in as many places as possible to ensure the shelf is properly supported.
Once you have all of your pocket holes drilled, you can paint your shelf. I would paint as much as possible prior to hanging. It makes it easier to paint when it’s not on the wall!
When all paint has dried, use pocket hole screws to attach the floating shelf to wall. We installed our shelf in the center of the horizontal lattice moulding. Have one person hold the board level and in place while the other uses the pocket hole screws and a drill to attach the shelf to the studs. Once the board has been secured to the wall, paint the inside of the pocket holes, including the screws! This hides the pocket hole attachments and gives the shelf that true floating look.

10. INSTALL THE DESK
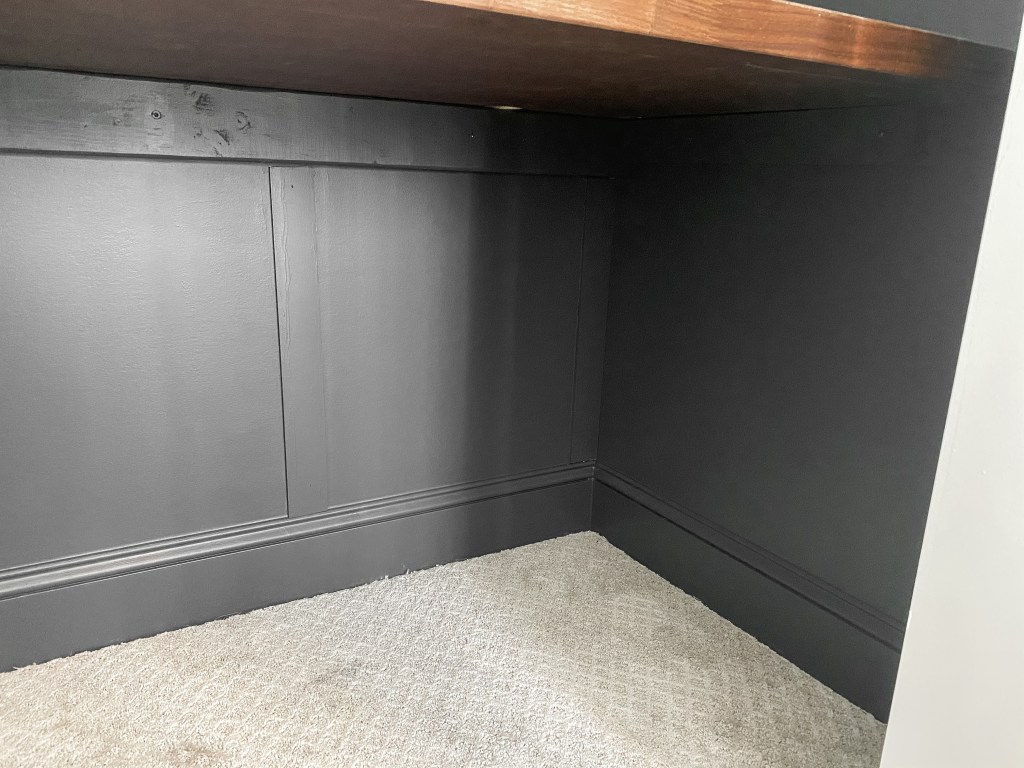
Once all paint has dried and all moulding and shelves have been installed, carefully move the desk into the closet and onto the supports. Our desk is so heavy and is such a tight fit into the space that we didn’t feel the need to secure the desk to the supports. If you wanted to secure it to the supports, you could use an angle bracket to do so.

That’s all there is to it! This project took us two days to complete and came with a cost of roughly $80. Keep in mind, however, we already had the butcher block and tools, so we only had to purchase wood, paint, caulk, and some paint trays. Butcher Block is probably the most expensive part of this project, so if you can find a good deal on Facebook Marketplace or at a local salvage store, you can save a lot of money! If you have a Southeastern Salvage nearby, they usually have good deals on butcher block.
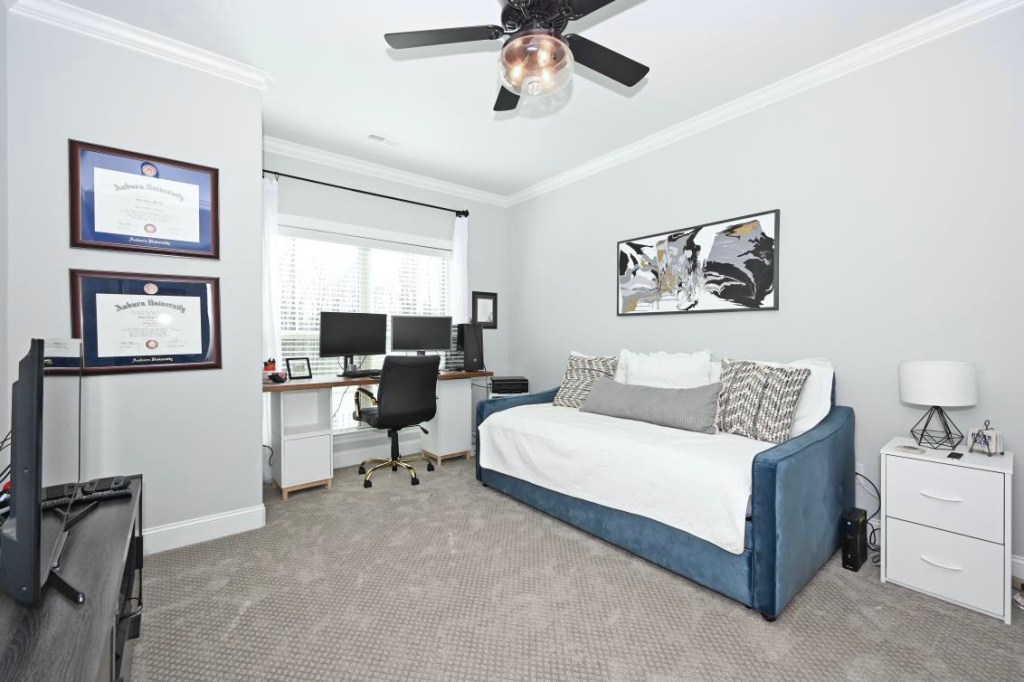
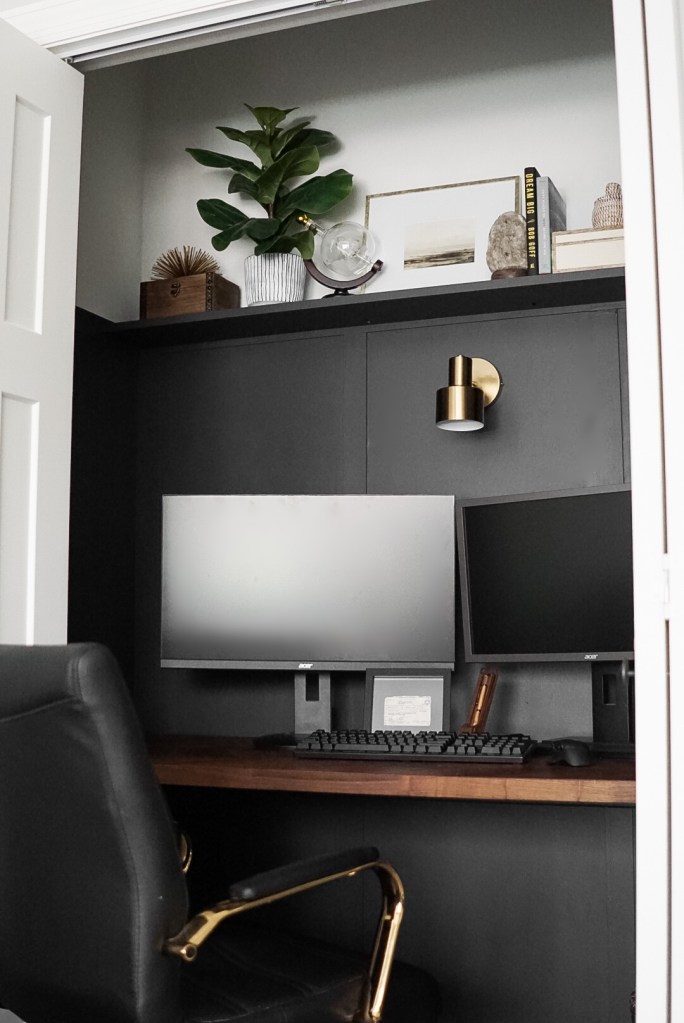
You could also trade the floating butcher block desk for a free standing desk, as seen below. This space designed by Studio McGee in Season 1, Episode 1 of Dream Home Makeover was actually my inspiration for this project. I love how they turned this unused space into a functional little office nook!

FUNCTIONAL DETAILS


In addition to how we installed the DIY board & batten and floating desk, I wanted to share some of the details and life hacks we used to make this space pretty and functional.
1. CORD MANAGEMENT SOLUTIONS


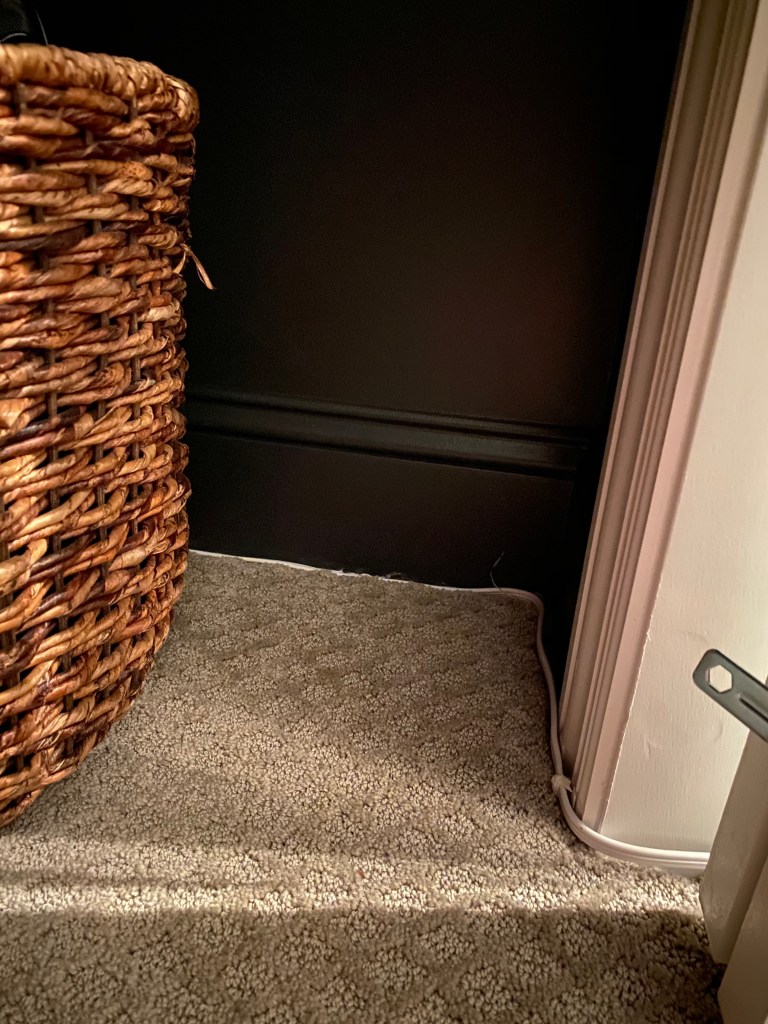
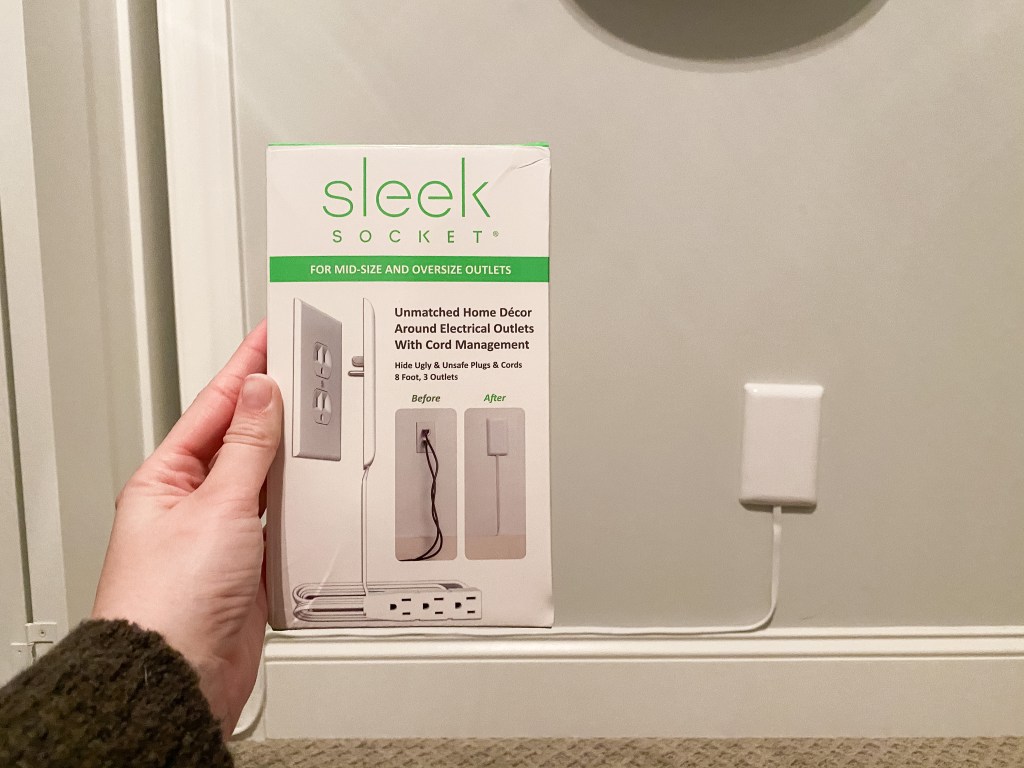
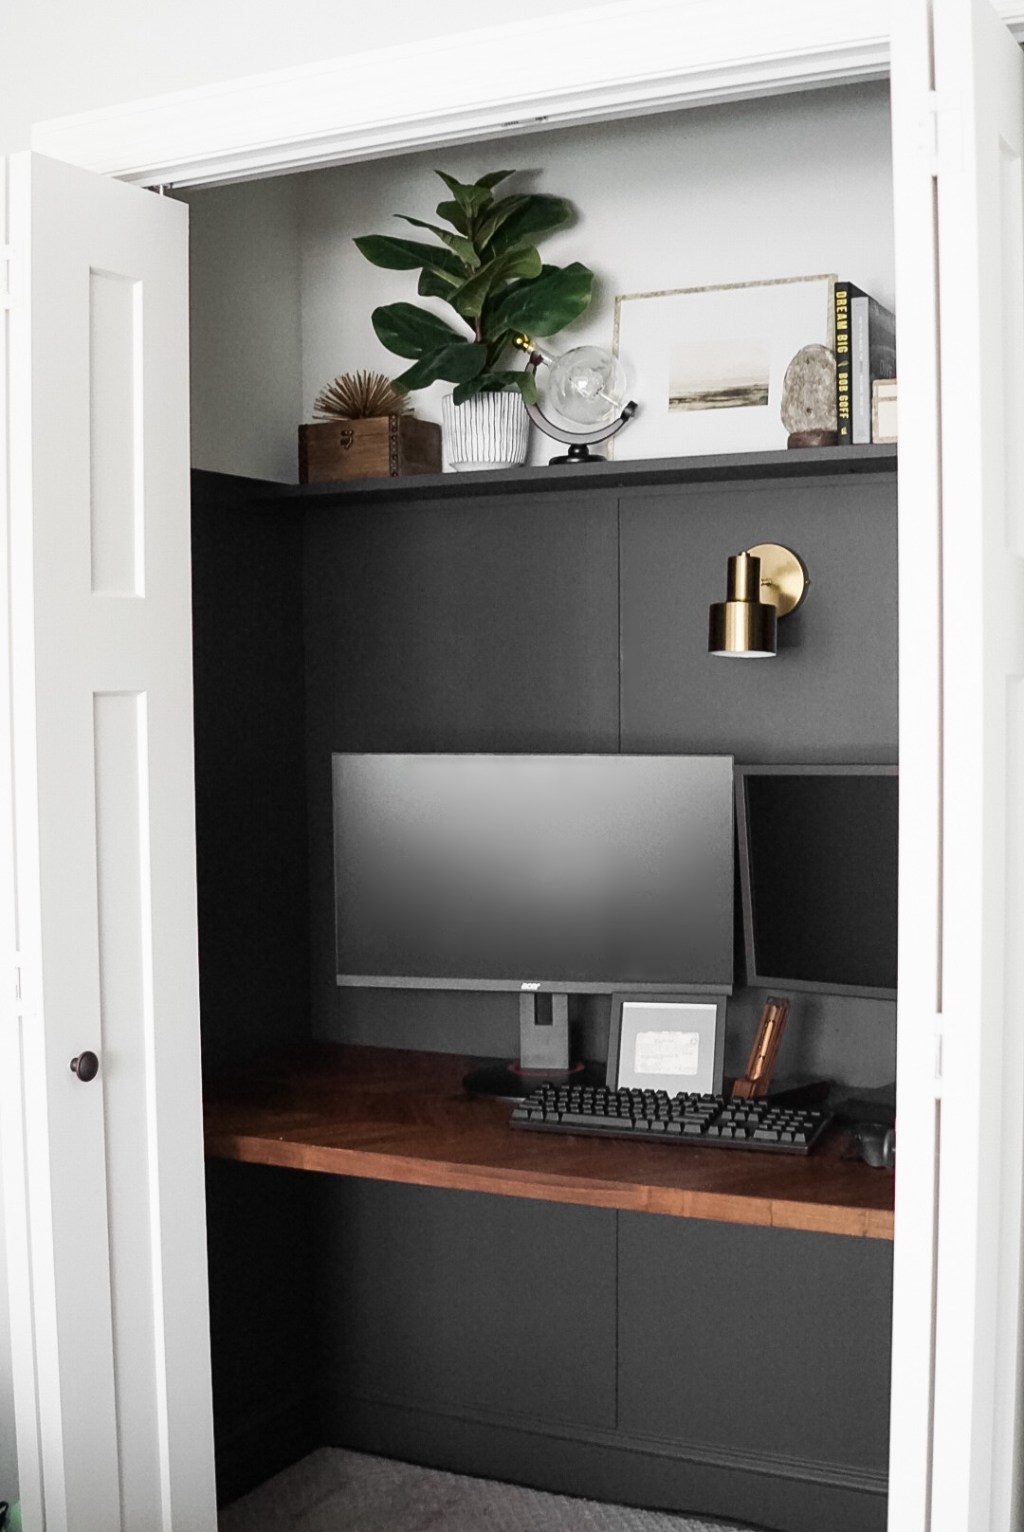
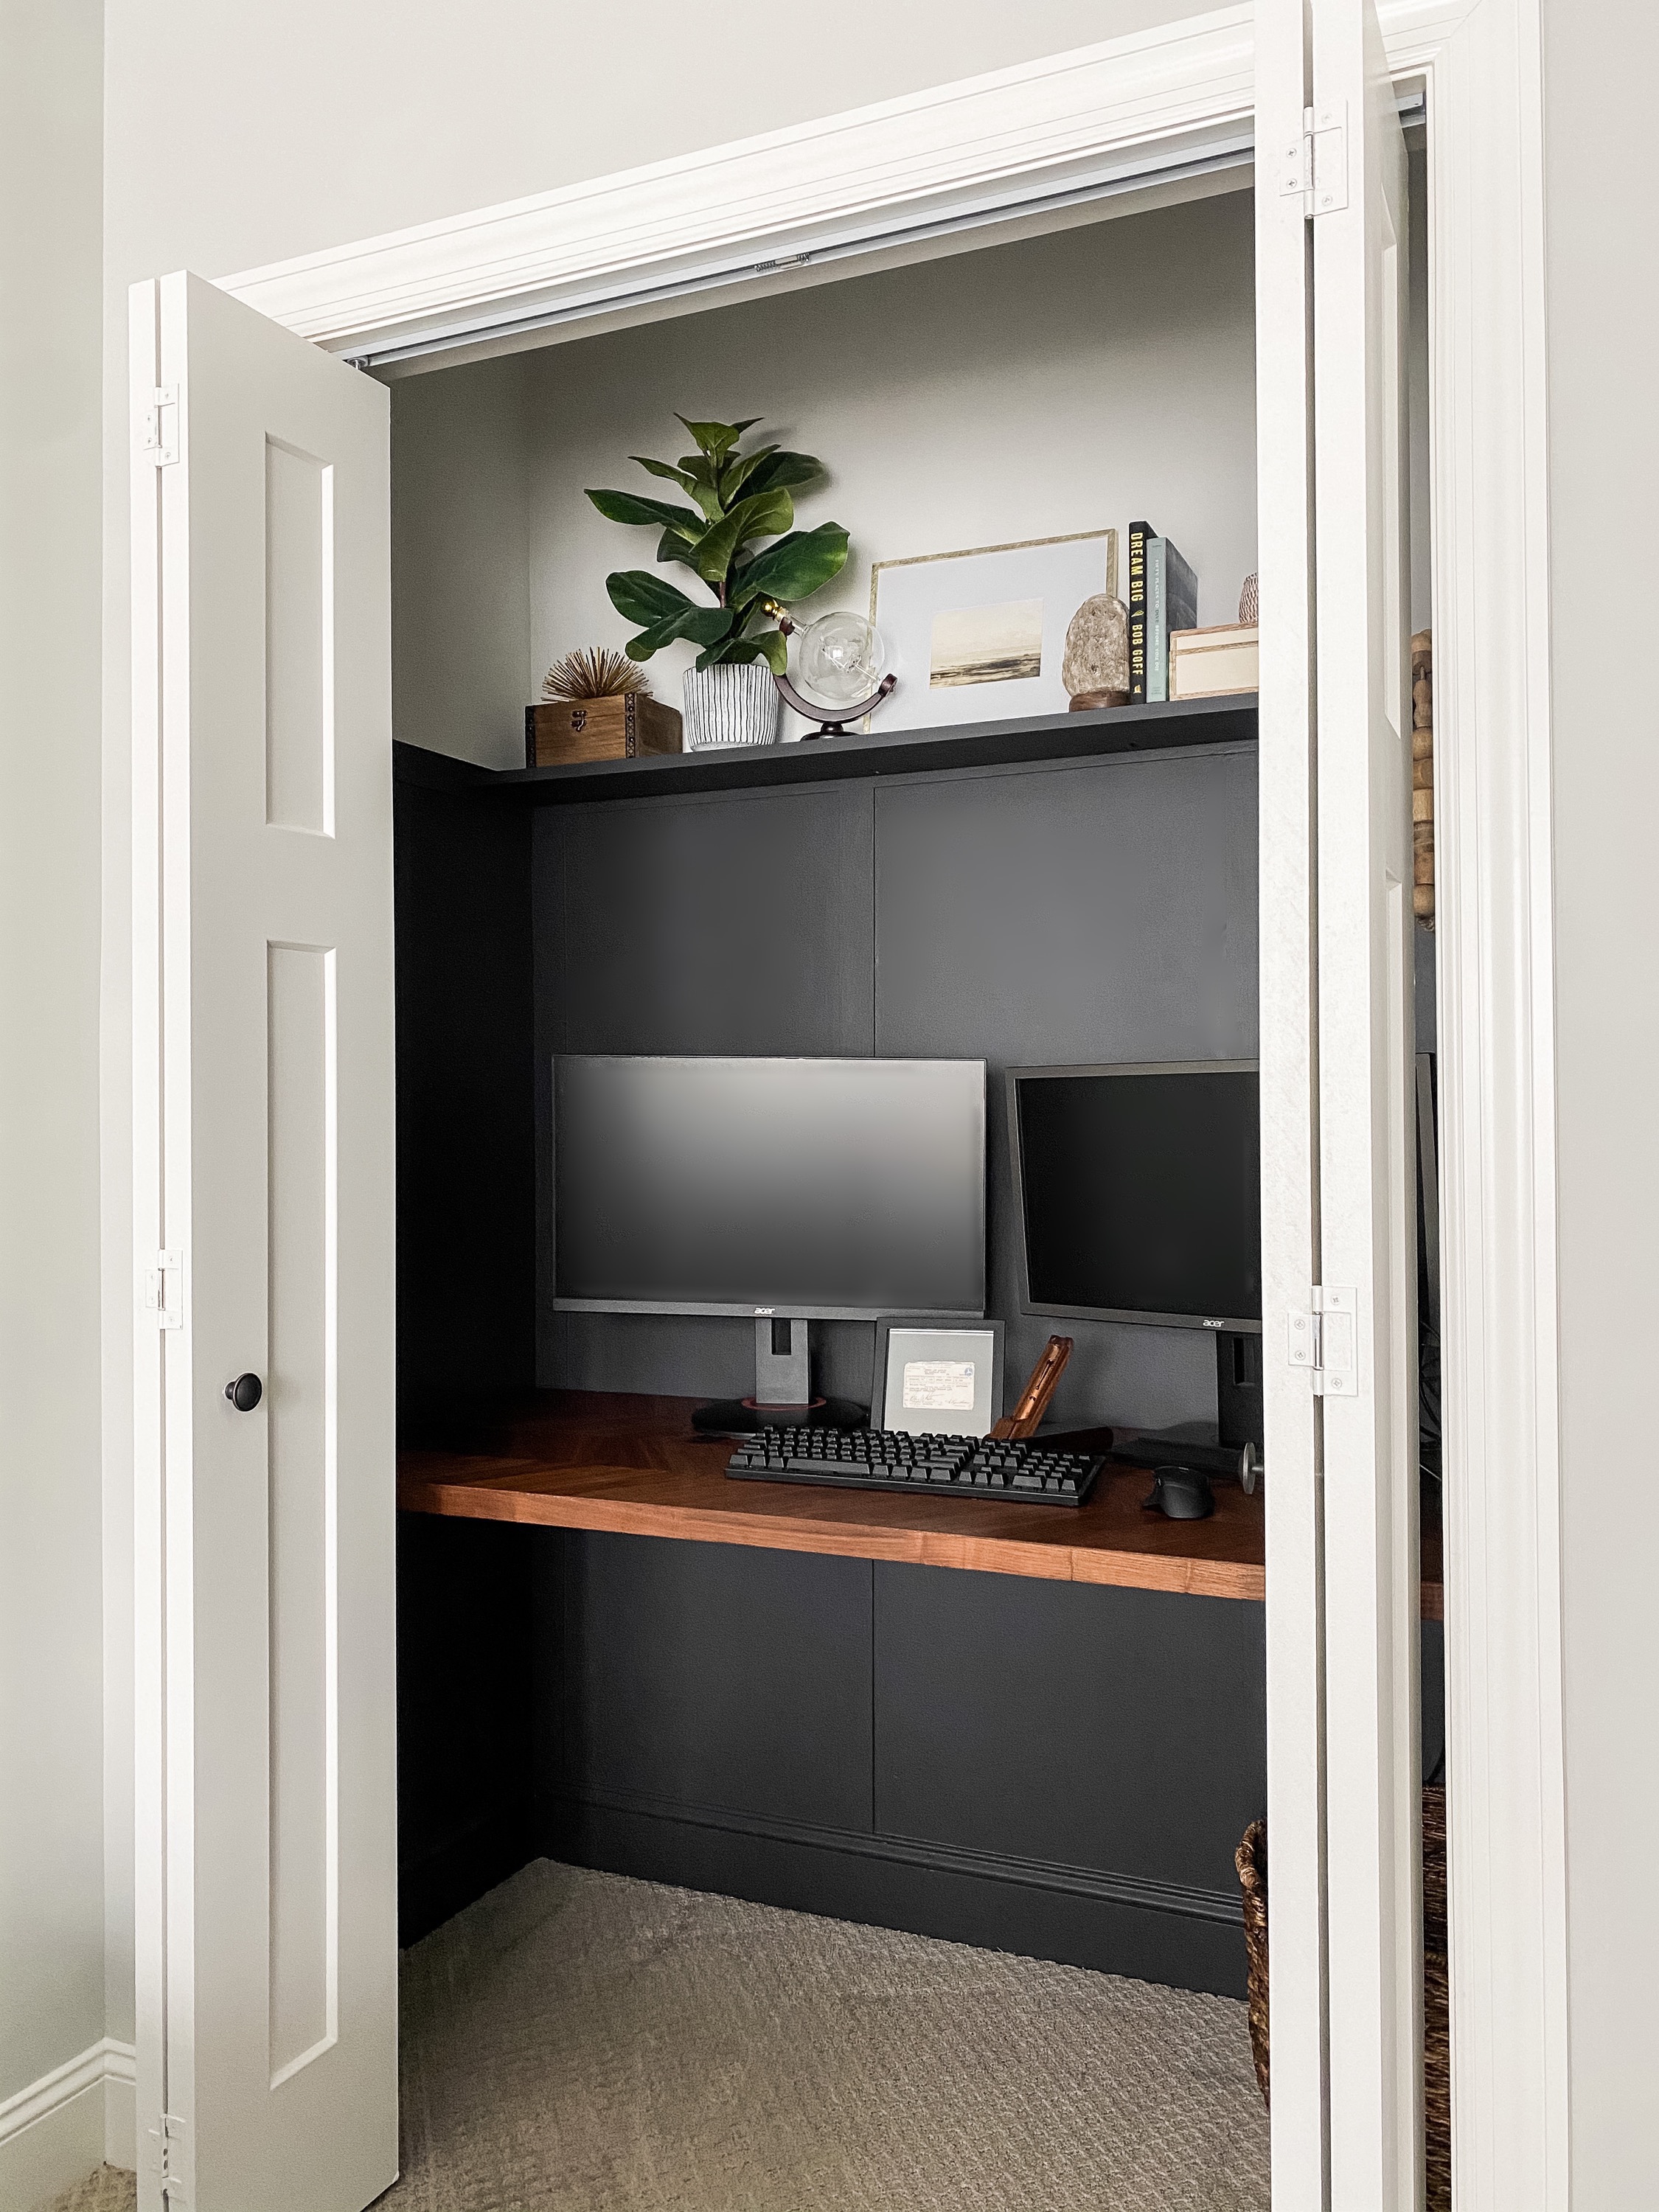
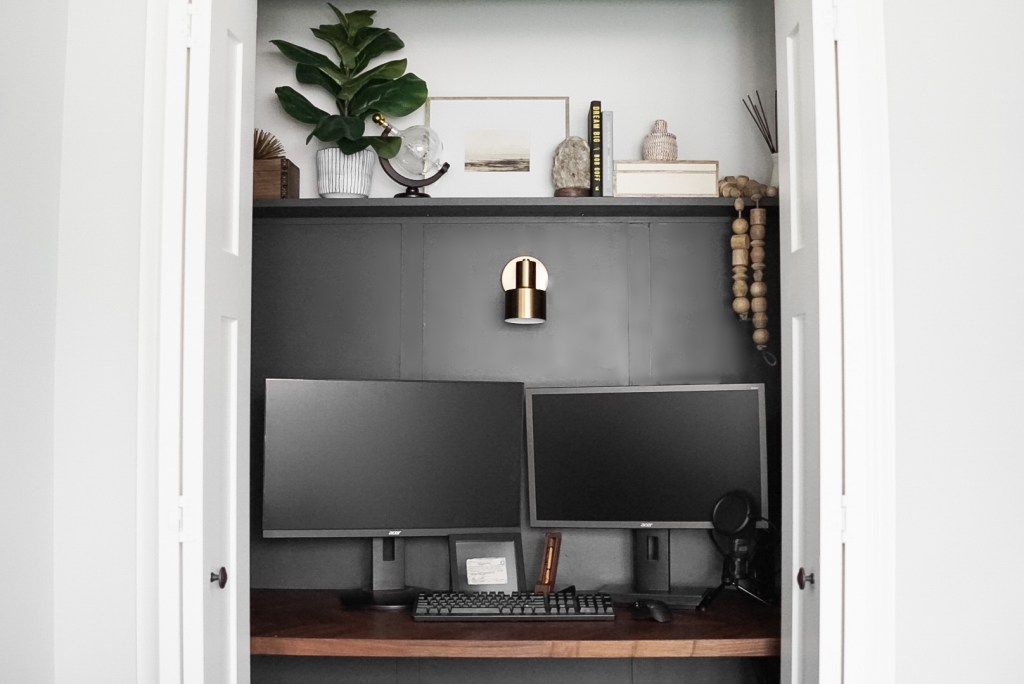
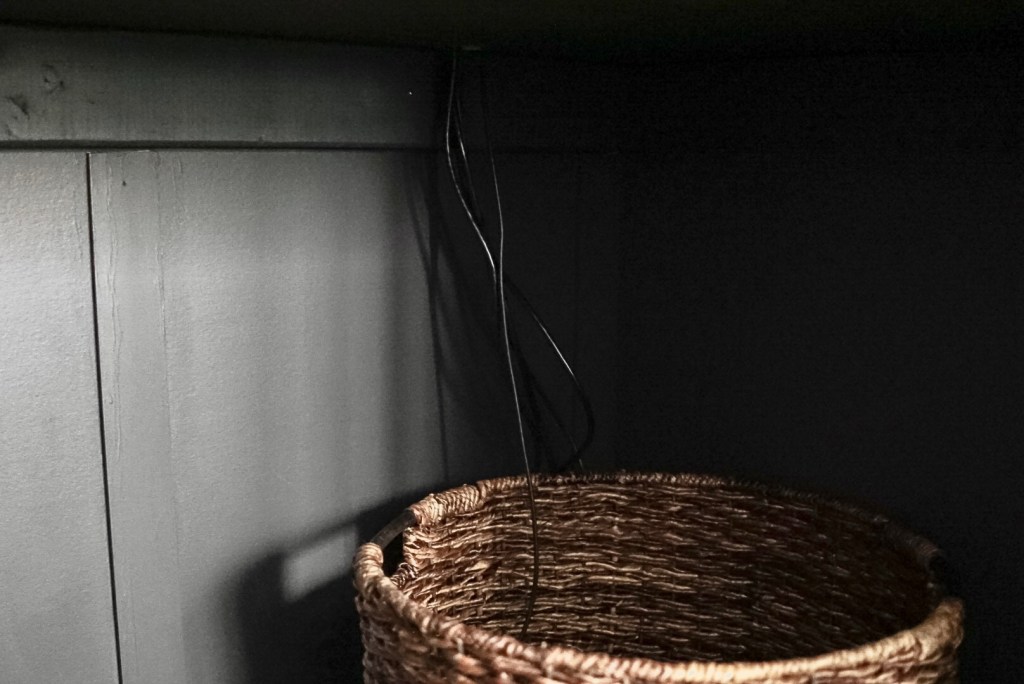
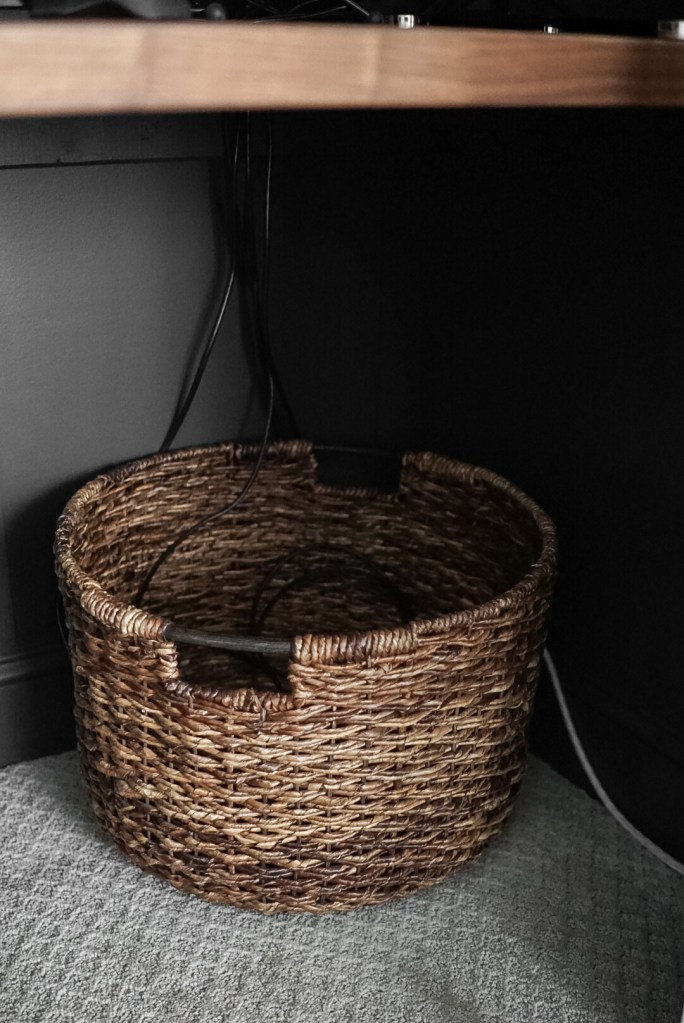
One thing I LOVE about the cloffice is that it hides all of the not so pretty things! The computer tower is nestled away behind the closet wall and all cords run behind it through the hole we cut in the butcher block. Since we do not have any outlets inside the closet, we needed to run an extension cord from outside the closet to supply power. The Sleek Socket was the PERFECT solution for a neat and clean way to run an extension cord into the closet. It comes with everything you need to neatly secure the cord to the wall, and it blends in with the crown moulding instead of being an eye sore. We connected all of of the monitors and computer tower to the sleek socket, and hid the outlet away behind a basket. This basket serves not only to hide the cords, but also as storage for things like controllers, laptop cords, and other necessities.

Before, we had cords everywhere, two big monitors and a tower blocking the window, and just an overall messy look. Now, all of the cords are organized and tucked away, the tower is hidden behind the closet wall, and the space feels tidy and sophisticated.
2. FAKE HARDWIRED SCONCE
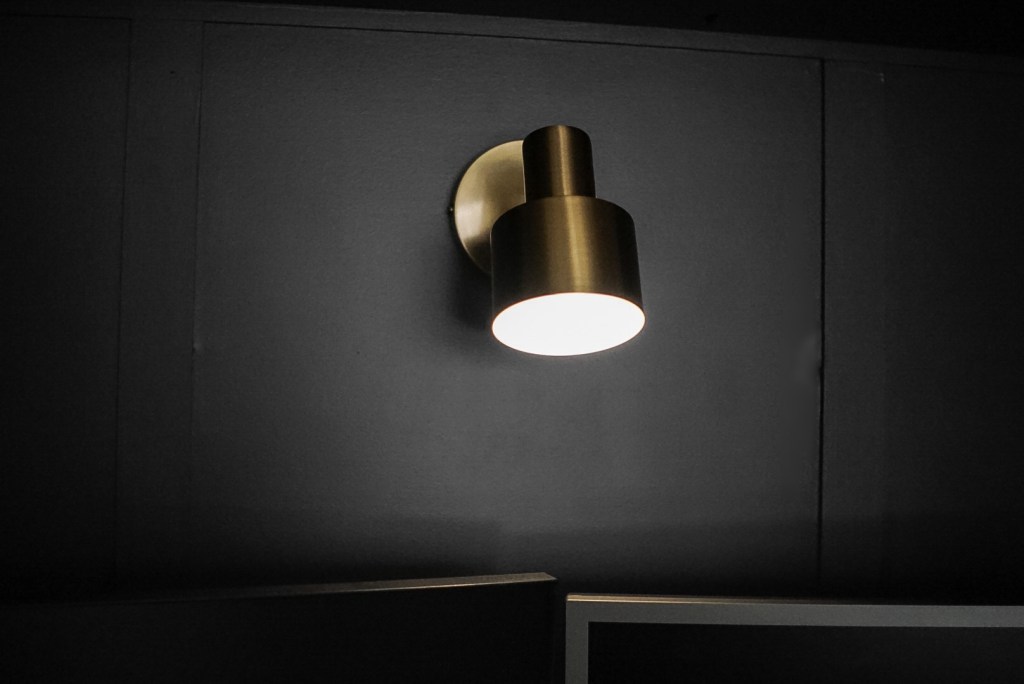
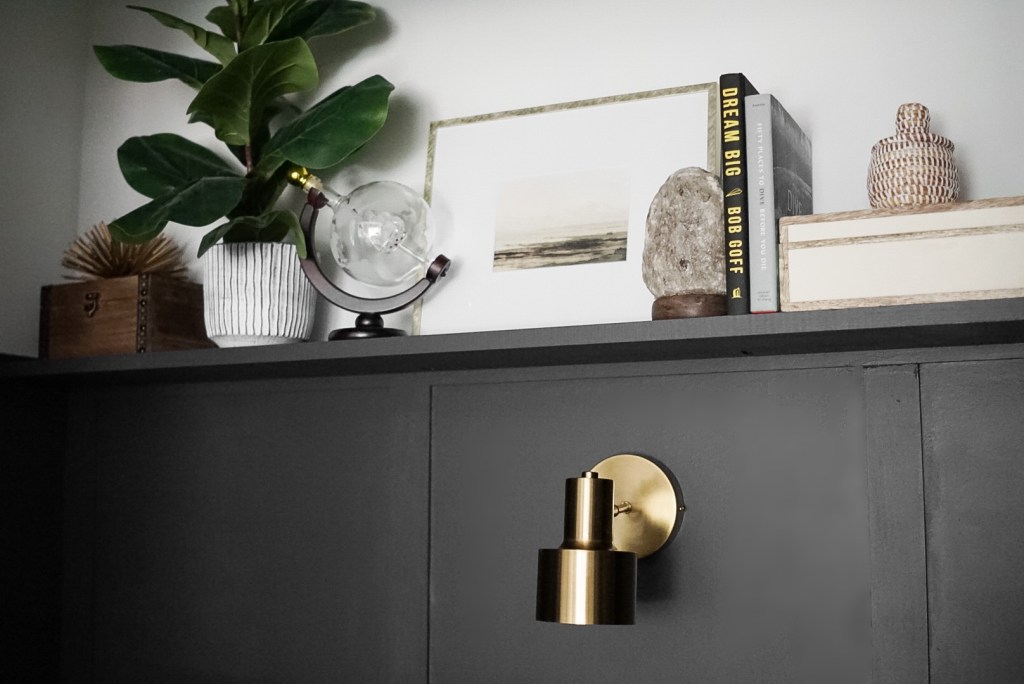
Since this closet does not have a light, we wanted to add in a lamp or sconce. With two large monitors, there wasn’t a lot of space for a table lamp, so we decided to go with a sconce! To make this a usable light without needing an electrician to come and hardwire it in, I used a battery operated puck light! They make remote control puck lights, but since this sconce would be within reach, I opted for a touch light. If you were putting it higher up, I would recommend the remote control puck lights!
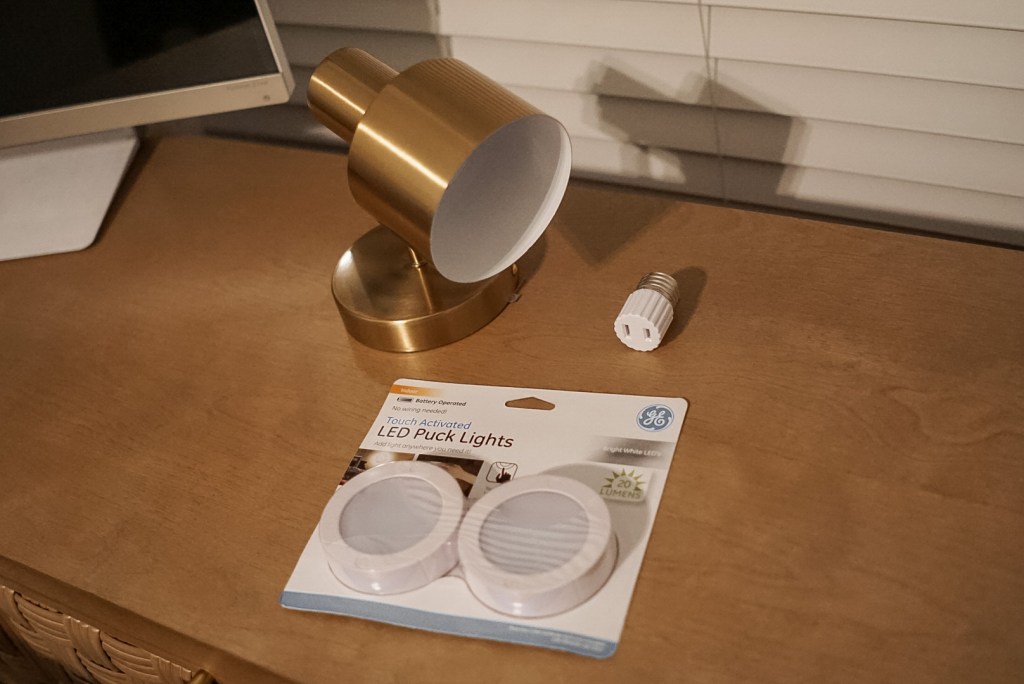
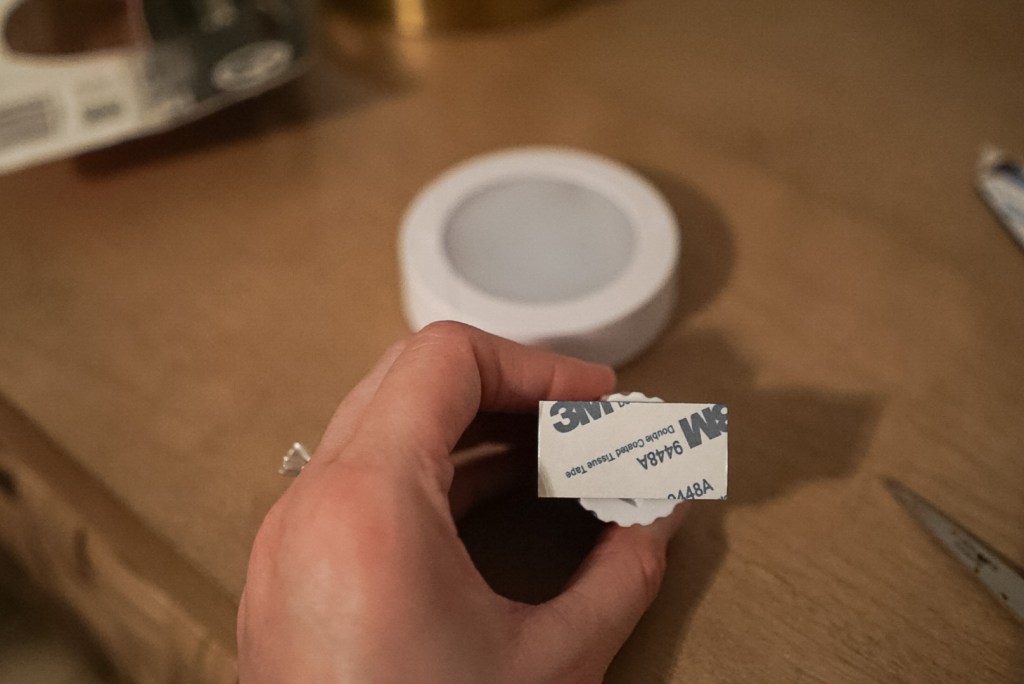
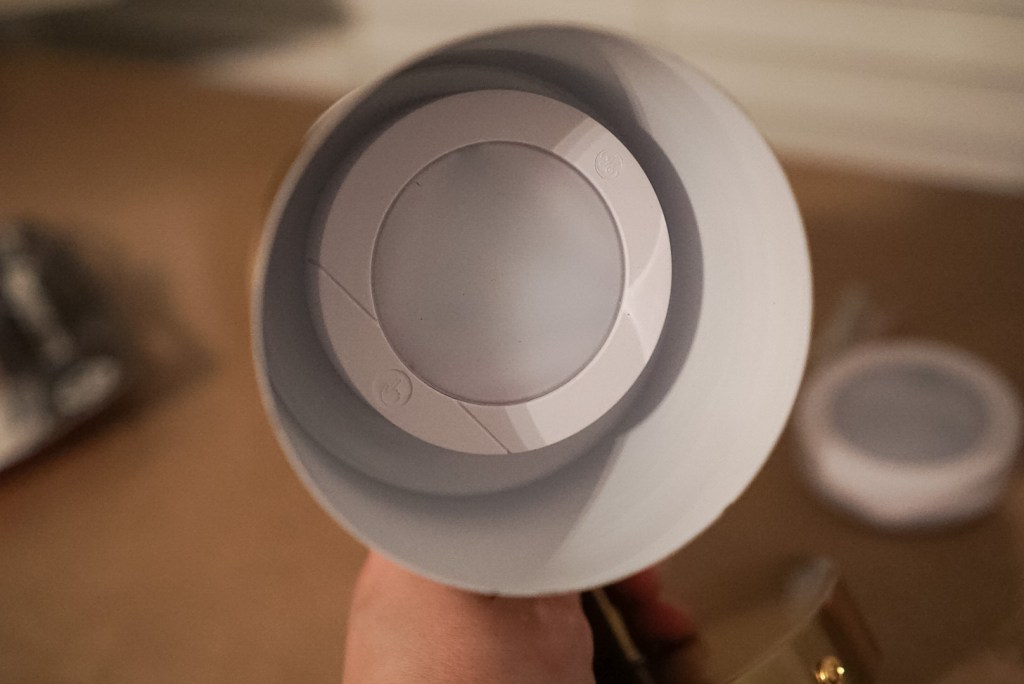
All you need for this hack is a sconce, puck light, adhesive command strip, and an E26 Light Socket Plug Adapter. The puck lights I purchased came with adhesive, so all I had to do was attach the puck light to the socket plug adapter and screw it in like a light bulb. Now all you have to do is tap the light and it comes on!
That’s all I have for you on this little “cloffice” renovation. By turning this closet into a desk space, we are able to really maximize the space in our home office and make room for a second desk (for me 😊). I really love how this space turned out, and I’m super excited to give our home office the makeover it deserves!
Thanks for reading, and happy DIY-ing! 🙂
SHOP


3 responses to “HOW TO TURN A CLOSET INTO A BEAUTIFUL, FUNCTIONAL OFFICE SPACE”
[…] To read all the details on how we turned our cloffice into this beautiful, functional office space, click here! […]
LikeLike
[…] become cozy home office nooks. Add shelving, a desk, and a sliding door to make a work area. This closet office conversion turns small spaces into private, distraction-free work […]
LikeLike
[…] Source: stayhomestyle.blog […]
LikeLike