
If you’ve read my bio, you’ll know that I have been taking some Interior Design courses through the College of Professional Studies at The University of Alabama in Huntsville! These classes are a part of a five course certificate program that includes Interior Design Fundamentals, Design Development Practices, Interior Space Planning, Design and Architecture, and Fundamentals of Digital Interior Design. Earlier this year, I finished up Fundamentals of Digital Interior design, where I learned how to use SketchUp to design and model 3D spaces, and just this past week, I finished up Interior Design Fundamentals! In this post, I’m going to give you a quick look at the space I designed for my final project, and give you some affordable designer dupes for the pieces I chose to use in my project.
Disclaimer: Some links contained in this post are affiliate links. That means that if you click on the link and purchase an item, I get a small percentage of that sale at no extra cost to you. As an Amazon Associate I earn from qualifying purchases. Please know that products and brands recommended here at stay home style are products that I use, love, and trust.

First, I want to give you a little bit of background on the project guidelines! Due to Covid, we were a little limited on what we could do, so our project was pretty simple and straight forward. We were given a blank floor plan and asked to design a space using the tools and concepts covered in our class. We could design the space to be any type of room we wanted, and had the ability to alter the placement of doors and windows while maintaining the overall layout and room dimensions given in the blank floor plan.

The specific guidelines consisted of three parts:
- Create a concept board to serve as inspiration for your space. This board should convey the mood and feel you envision for the space.
- Create a space and design plan for your room showing the furniture (drawn to scale) and indicate the furniture pieces you would use with a numbered legend. We were required to denote paint colors, flooring selection, lighting, accessories, and at least four pieces of furniture that would be used in the space.
- Write up a quick summary of the space that includes things such as the design theme, overall function of the space, and how the elements and principles of design are utilized to create the overall success of the design.
PART 1 : CONCEPT BOARD
Due to copyright issues, I have decided not to share the actual PowerPoint slide containing the inspiration photos for my design. Instead, I have saved all of the photos to a Pinterest board, which I am linking below:
This concept board is basically a compilation of ideas for what I envisioned in the space. I wanted a soft, neutral base palette layered with natural, organic textures and muted pops of green and blue. I wanted to incorporate wood, leather, and metallic accents to help blend the mixture of classic and modern elements throughout the space, and I wanted to incorporate pops of black to create dimension and contrast against the neutral base and muted color palette. I envisioned this space being a common gathering area where the homeowners would be able to relax, watch TV, spend time together as a family, and entertain guests. With this in mind, I wanted to find furniture and decor that not only looked beautiful, but had purpose and would be suitable for everyday living. A living room is space for living, so I wanted to be intentional about laying out the room in a functional way and choosing pieces that would bring in a lived in feel and aesthetic

I drew a lot of inspiration from this mood board created by Alison Giese Interiors. It is grounded in neutral colors and organic textures, but the blues, greens, and pop of black hardware bring in contrast and dimension. I love the way the natural wood grounds the more luxurious marble, bringing in that elevated, yet lived in feel I wanted for this space!
PART 2: SPACE & DESIGN PLAN
This part of the project was super fun for me, because I had the opportunity to utilize the skills I learned in my previous class, Fundamentals of Digital Interior Design! I didn’t have a ton of time to work on this, so the model definitely isn’t perfect, but it was such a fun way to visualize that blank floor plan and bring my vision to life.
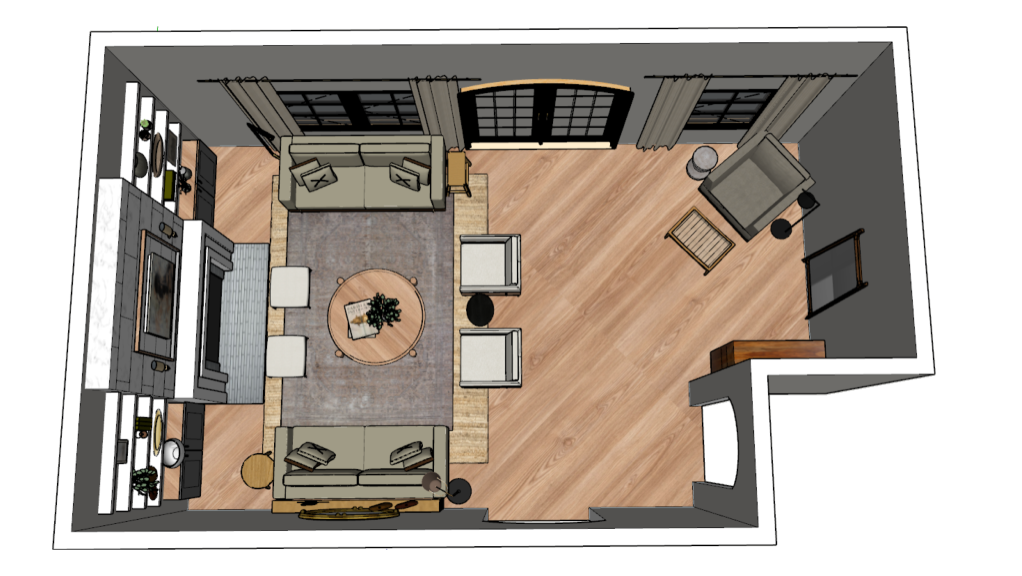
Below I’m showing you views from different angles of the room so that you can get a better feel for how it’s laid out:


In my mind, I envisioned the home having arched doorways throughout that would create interest and add a classic touch to the space. I imagined that when you walked in through the front door, you would have a direct view of the black, arched french doors that would take you from the main living area to a beautiful outdoor living space. From the kitchen, I envisioned a view of the luxurious, marble fireplace flanked on each side with floating shelves for displaying decorative art and decor, and built in cabinets for functional storage.
In the main seating area, centered around the fire place, I’ve included two sofas, two chairs, and two ottomans to provide ample, comfortable seating for both entertaining and everyday living. The furniture has been intentionally placed to function as both a conversation area and a place where the homeowners could relax on the sofas and watch TV. I’ll get to this soon, but the art work seen above the mantel is meant to represent a Samsung Frame TV, which is made to look like artwork when not in use, but functions as a normal TV when turned on!
The reading corner is meant to function as a separate area of the main living space where you could relax and read a book, or enjoy the view from the window. I’ve included a comfy arm chair and footstool for relaxing, a floor lamp for some extra task lighting, and a bar cabinet to serve as a functional furniture piece. I’ve also added a mirror adjacent to the window to reflect some of the natural light back into the room, and serve as a simple, decorative piece that takes up space while keeping the room feeling light and airy.
All of the furniture and finishes you see in this 3D model were pulled from SketchUp’s 3D warehouse. I tried my best to pull furniture, finishes, and decor that were similar in looks and color to what I had in mind for the space, but I was limited by what was available. In the next few slides, I will show you more specifically all of the furniture, lighting, and accessories I had in mind for the space!
Click the name of the item below each picture to view the product listing.


You will notice that most of these items are NOT budget friendly. Since this was a hypothetical project, with no real budget, I went all out with designer furniture from places like McGee & Co, Ballard Designs, Pottery Barn, Circa Lighting, Burke Decor, and Serena and Lily. All of these pieces are BEAUTIFUL, and amazing quality, but not realistic for the average budget. After I finish up showing you the final part of the project, I’ll go through an entire section of designer dupes to show you some affordable options for getting this designer look for less!
PART 3: SUMMARY

DESIGNER LOOK FOR LESS

In this section I will go through all of the furniture, rugs, lighting and accessories used in this space and give you some affordable options for getting this designer look for less! The more expensive “splurge” items will be shown on the left, and the affordable “save” options will be shown on the right. Click the number below the image corresponding to each item to view the product listings.

SPLURGE
one // two // three // four // five // six // seven // eight // nine // ten // eleven // twelve // thirteen
SAVE
one // two // three // four // five // six // seven // eight // nine // ten // eleven // twelve // thirteen

SPLURGE
one // two // three // four // five // six // seven // eight (similar) // nine // ten // eleven // twelve // thirteen // fourteen // fifteen // sixteen // seventeen // eighteen // nineteen // twenty
SAVE
one // two // three // four (a) // four (b) // five // six // seven // eight // nine // ten // eleven // twelve // thirteen // fourteen // fifteen // sixteen // seventeen // eighteen // nineteen // twenty


I hope you enjoyed this quick look into my final project, and all of the affordable, designer dupes I’ve put together for you! I was honestly so surprised at how similar some of the dupes I found were to the designer pieces! Don’t get me wrong, I’m all for saving and investing in quality pieces for your home, but designer furniture prices don’t always fit into the budget, so having affordable options is always nice too. I hope this post has inspired you, and shown you that you can still achieve an elevated, designer look while ballin’ on a budget!
I’d love to hear your thoughts and any designer dupes you’ve come across in the comments below 🙂

Ashley you did a super job with this! Looks beautiful! Love you!
LikeLike
Thank you so much!! Love you too 🙂
LikeLike
Ashley, you are so talented and I can tell you’ve put a lot of work and thought into this. It’s great that you give an option for those on a tight budget. Beautiful work!
LikeLike
Thank you!! That means so much to me! This was definitely a fun little project. Thank you for taking the time to read it! 😊
LikeLike
New here 🙂 This is beautiful and helpful. Wondering where you got that black square marble tile and what the name is? Where did you use it? Considering something like that for my fireplace surround.
LikeLike
Hey Anna, thank you so much! ☺️
The image with the black square tile was actually borrowed from Alison Giese Interiors with her permission to share. If you click the image within my blog post, it will take you directly to her website. She can probably give you more information on the tile ☺️
This was just kind of a inspiration image for this project, so I didn’t actually use that tile anywhere. It would be gorgeous as a fireplace surround though!
LikeLike